

Once you’ve created your site, it’s time to add your pages to it!
In Simplero, there are a whole bunch of pages that you can add. Let’s dive into the options! 🚀
Which Page Should You Pick?
Each of these pages has different options and uses. Let's take a closer look at each one:
Pages - Allows you to design a page on your Site. Here are some ideas for pages you can build:
-
A simple welcome page with a video at the top, welcoming members to your site and showing them where to get access to what they paid for.
It could even include a course catalog so your customers can quickly get to the course they want to access.
A sales page to up-sell members to other products that exist within this Site or outside it.
NOTE! Here's our guide on how to use our page builder - bookmark and refer back to that as you build out your pages 🤓
Favourites - Course lessons can be saved as favourite by your members. Add a Favourites page they can easily reach to see their favourite content.
Blog and Forum - Here is where you would give access to the Blog or Forum that you’ve been working on in the back end of your Site.
Groups - You can set up exclusive Forums that only certain members can access, based on what they paid for.
Member Directory - Here is where you can let members see each other. Members are anyone who has access to the Site for any reason.
External Link - This is a great way to link to an outside Sales page, a Scheduling Link, etc. Basically, anything you can find on the interweb that isn't created on your Site.
Terms and Conditions - This will link to the terms and conditions set up in your Account Settings.
Customer Service - This will link to the email address for support that you added in your Account Settings and can exist in the Navigation menu and Footer (wherever you choose to add it).
Once you have decided on the page you want to add, below are step by step instructions for managing that page.
NOTE! You must have at least one published, non-hidden page on a Site to serve as the home page. Otherwise, your members will not be able to access the Site.
You can check out our Demo Site right here!
How to Add a Page
Select Content from your Simplero Dashboard
Choose Sites from the drop down menu
Select the Site you want to add pages to
Press the Edit layout & navigation button in the top right-hand corner:

Press the + button on the left next to Main navigation, and choose the Page you want to add from the popup list.
In the screenshot below, I chose to add a regular Page so I can build it out:
Once you choose the Page type that you want to add, this will create the Page and add it to the list of items on your Navigation menu on the left.
You can then click on the title of the Page to go to that page directly (if you chose to add a blank Page):

You can also press the pencil icon next to each menu item to edit the label we display on the Navigation menu for that page:

To add a subpage, simply select the + sign beneath the Page you want to be the mother page, choose + Add under this and follow step 6 to add a page and customise the title:

To rearrange menu items, just drag and drop the titles.
NOTE! Head to this guide for more information on how to use the Layouts feature 💥
Add a Page from a Template
From the Site > Pages tab, click on ‘Create a new page’ button on the top right.

Pick the template, and give the page a name:

Once you’ve finished editing the page, you can add it to the Site navigation heading over to the Layout settings:


How to Edit an Existing Page
Select Content from your Simplero Dashboard
Choose Sites from the dropdown menu
Select the Site you want to add pages to
Select the Pages tab
Click the page name or the Edit icon on the far right:

You will be redirected to the Editor screen. Be sure to review our guide on how to edit the sections and elements on the page.
In the Sections column on the right side, you can add or delete sections, or move the sections around:

Click the pencil icon next to the title in the top left-hand corner to change the page name:

-
Press the three dots in the top right-hand corner and choose Settings from the dropdown menu to update the URL, Search Engines and Social Settings and Publish Status:


Make sure to press the Save changes button at the bottom.
How to Remove a Page
Select Content from your Simplero Dashboard
Select Sites from the dropdown menu
Select the Site you want to add pages to
Select the Pages tab
-
Check the box next to the Page name you want to delete. Now you can delete the page two different ways:
Press Select action… choose Delete from the dropdown menu, click OK to confirm:

OR press the Trashcan icon and click OK to confirm:

How to Limit Who Can View a Page
Pages in a site are published in 3 different ways:
Published - viewable all the time.
Scheduled - they become viewable at a specific point in time.
-
Dripped - only viewable when you give access to it manually or via a trigger/automation.
NOTE! This option only appears when the Site is closed to the public and requires a login.
A few notes about Dripped Pages:
-
This works great if you want to have a page on a Site that is only viewable by a select group of people.
For example: If you have a membership with different levels (Bronze, Silver and Gold) and you only want this page to be visible to the Gold level - set the page to Dripped, and grant access to the Gold purchasers via a trigger or automation.
The Dripped option only appears when the Site is closed to the public and requires a login.
Social Media Sharing
We know you and your customers want to share your website on social media. But sometimes those shares don't look the way you want them to, and Facebook prevents users from editing the share. We know this is to protect against the false representation of the shared site, but for legit companies like you, who want their business represented beautifully, this can make things a little harder.
But Simplero makes it easy for you to control what image will be in that share, giving you some say in how your website is represented.
All you need to do is follow the steps below:
Select Content from your Simplero Dashboard.
Choose Sites from the dropdown menu.
Head to the Site you want to share.
Select the Pages tab.
Press the Settings icon next to the page you want to edit:

Scroll down to the Search engines and social section.
For the Social sharing image, click the Choose file button:

Choose the image you want to display.
NOTE! The image must be at least 200 x 200 to be accepted by Facebook, but the recommended size for the image is 1200 x 628.Select the blue Save button in the top right-hand corner.
To edit multiple pages in a row, or to see which ones have already been updated, you will also find these settings on the very convenient Content >> Sites >> Choose the site >> Pages >> SEO tab:

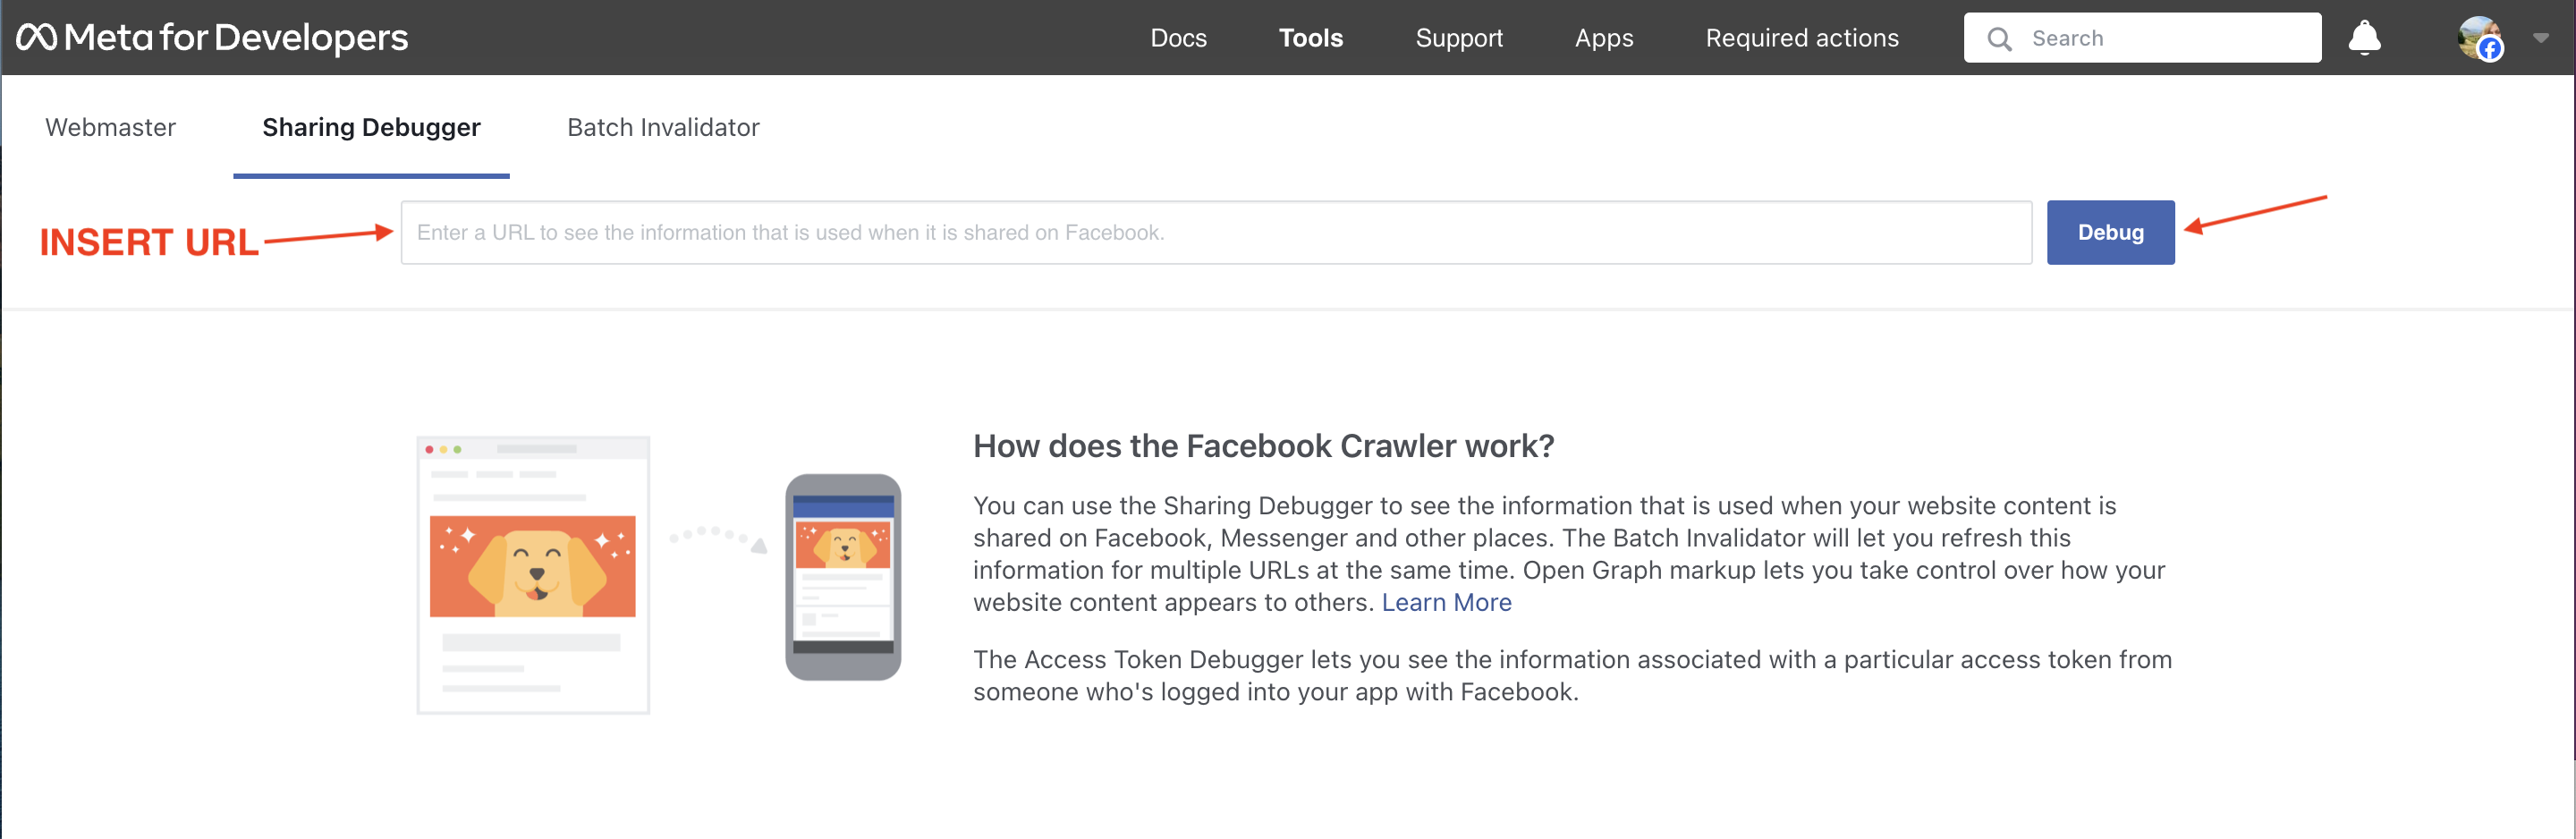
NOTE! If you add the social sharing image and it doesn't appear when you try to share the page on Facebook, run it through the Facebook Sharing Debugger tool and scrape it a few times until the image appears. See below:
Website XML
To see your sitemap XML, for sending to Google, for example - just add /sitemap.xml to the end of your URL, like this: https://simplero.com/sitemap.xml
Favourites
Your members can save their favourite lessons across your site courses using the heart icon displayed on the Course Overview:

Also on Individual Lessons:

Favourite content is saved at the site level and can be reached on the site URL /favorites (simplerosite.com/favorites).
Adding a Favourites page to your site will improve your members’ experience as they will have their favourites handy from anywhere on your site:
Head to Content >> Sites >>> Choose the Site
Press the Edit Layout & Navigation button
Select Header & Navigation:

Toggle Favourites ON to add it to the Navigation Menu:

Blog and Forum
Before you add Blog or Forum pages to your Site, you’ll need to enable them first:
Press the Forum and Blog tabs:

Press Enable the blog or Enable the forum:

Press Enable blog and adjust the Title on blog page and Community Features:

Press Enable forum and adjust the Forum page title, set the Moderation Settings for Forum Posts/Comments, and add Intro Text:

You can always have a look at the Forum and Blog pages (before you add them to your Site header) from the admin page:


Member Directory
The Member Directory is enabled by default. It allows members to share their profile info and get tagged in posts and comments.
If you’d rather disable the member directory, navigate to the Site >> Configure >> Community Features section and detoggle the Member Directory option:


If you keep it on, you can choose to hide new member’s profile from the member directory and mentions by default if needed.
Members will need to be logged in to access the Members page, where they'll find who’s a member of the site, the date they became members, and their time zone:

On each member you'll find their time zone, any engagement badges they've been awarded, and their activity on the site:

Suite 92530
New York, NY 10003
United States