

If you prefer a video explanation, head to our How To Videos
Creating an Embedded Form
Opt-in forms are a great way to grow your email list, increase conversions, and build an engaged audience. And having opt-in forms that are personal and customized can help a lot. That's why we put together this guide to show you how to customize your opt-in forms in Simplero.
Navigate to Marketing > Landing Pages & forms, then click on Create new embedded form:

-
Pick a template:

Design the opt-in form on the Edit tab:

Once there, you can:
a) Check the different designs for desktop/mobile views.
b) Edit the content by clicking on the text directly.
c) Customize the style of the form objects using the options on the right sidebar.
d) Select which fields to show on the form or add new custom fields: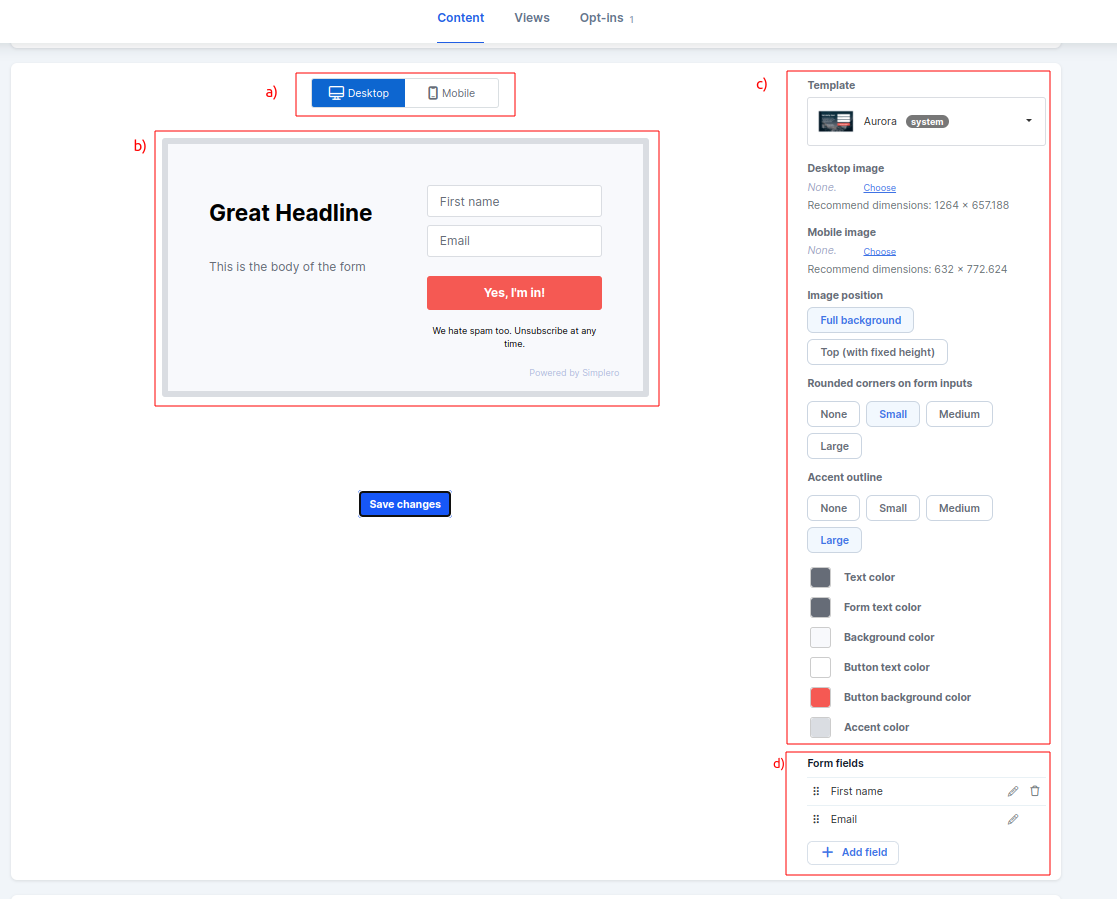
Navigate to Settings at the header's top right corner:

On the settings page, you will see different sections...
a) Edit the embedded form name, and turn On/Off to make it Live.
b) Presentation: Choose how the opt-in form is shown on the page.
Inline - Form is displayed wherever you insert the embed code
Modal - Form is shown in a modal box in the center of the page and the rest of the page is dimmed
Slide-in - Form slides in from the bottom or the side to be seen in the bottom-right corner
You can also choose the label for the link to close the modal and the template on this section.

c) Restrict views. Allows you to choose:
Which devices do you want to show it on (all, desktop, or mobile)
How long does the system wait to show the form to the same person again (in case you don't want the person to keep seeing the form every time they log in to the page)
How many times we show it to the same person
Whether to hide it from known contacts or not

d) Conversion Action: Choose what the form is used for:
Opt in to a list
Got to a product order form
Go to a URL
No action (just a popup)

e) After Conversion: Choose what we should do when someone has signed up
Use List behavior: We will choose what the list is configured to do
-
Override the list setting and:
Show message: You can then choose the message after conversion that will show only for this specific form.
Redirect: Customers are sent straight to that URL after subscribing, including when double opt-in flow would normally show a confirmation page.

f) Trigger: Choose what causes the opt-in form to be displayed.
Page Load - show right away
Exit intent - When it looks like the user is about to leave the page (only works on desktops)
Scroll percentage - when they've scrolled through a certain portion of the page
Time - after the specified amount of time on the page
Manual - manual trigger only - If you choose this option, you will need to add the manual trigger code to your page too.

g) Advanced Settings:
Teaser Mode: Customize a teaser when the form is closed
Expiration: To turn the form off automatically on a certain date in the future
Blacklist URLs: Add exception pages where you would not want this embedded form to be displayed over other settings anywhere else
Custom CSS code

h) Triggers: If something needs to happen after they sign up to this form, you would trigger that here.

Save changes
Now you are ready to embed the form on another page. Once you have finished creating the form, you will want to embed it on another page. This can be either a Simplero page or an external page. Continue to the next lesson to learn how to integrate an Embedded form on a Simplero page using the section Script.
Suite 92530
New York, NY 10003
United States