

Meta Integration: Meta Pixel and Verifying Domains
We all want good data, right? Good data is critical to building a successful online business. And, whether we like it or not, Meta has a lot of that data.
Simplero makes it easy to send data back to Meta. All you need to do is add your Meta Pixel (previously called Facebook Pixel) in one place. Just one. We’ll track all the relevant events accordingly.
Even if you’re not using Meta ads yet, you should install the Meta Pixel now. It'll start collecting data right away so that you don’t have to start from scratch when you’re ready to create your first Meta ad.
In this guide, we will cover:
Where Do I Add the Pixel in Simplero?
Go to your Simplero Account > Settings > Integrations > Meta. 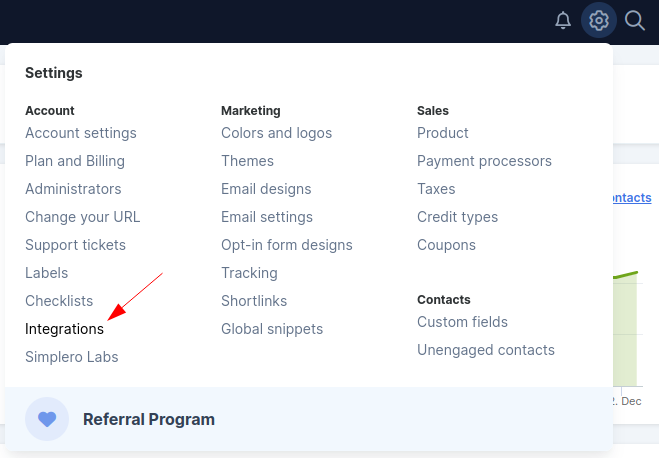

You’ll see a spot at the top to paste your Meta Pixel ID. 
After you paste your Pixel ID, hit Add integration, and you’re done (in Simplero at least). Head to Meta to see the tracking results.
Where Do I Get the Pixel in Meta?
Meta moves the Pixel around from time to time, so you might need to check their Documentation. As of this writing, you can find it in Meta’s Event Manager.
There’s a link to your Events Manager in your Simlero account in the spot where you can add your Pixel (mentioned above). Just make sure you're already logged into your Meta business account when you click it.
What Events Are Tracked Automatically?
Simplero tracks:
PageView
Purchase / Subscription / StartTrial
InitiateCheckout / AddToCart
ViewContent
CompleteRegistration
Lead
What does that mean in plain(ish) English?
PageView
Fired almost everywhere
Sites
Landing pages - embedded, full, and old-skool
Worksheets
Purchase order form
Purchase thank you page
List confirmation page
List thank you page
Not spaces (which are a deprecated feature - most of you don’t have this)
Purchase / Subscription / StartTrial
One StartTrial event for the main purchase where the period was free.
One Subscription event that will contain details of all the three purchases (id, name, quantity) as well as the total money you paid for these ($39).
One Purchase event that will contain the detail of the one-time purchase (the upsell). This too will contain the name of the Product, its id, quantity, and amount ($200).
When you complete a purchase, we fire some combination of these three events depending on the type of purchase.
For example, if you bought a Product with a free trial (first period is free), three order bumps ($13/per month each), and one upsell (one time for $200), we'll send those events to Meta.
InitiateCheckout / AddToCart
These events are fired when you visit the Order Form for a Product.
They include the same information (Product name, id, default quantity, value of the default price).
Both these events are fired with the same information at the same time.
ViewContent
We currently fire this event on the Product’s sales pages (the main one or additional full landing pages).
We send the associated Product’s information (name, category, id) and the page URL.
Complete Registration
This is fired when you submit a signup form for a List (on an embedded page/full landing page).
We send the List name as the parameter.
Lead
This event is fired when you successfully confirm your subscription (or if the List doesn't require confirmation). For example, when you get to the thank you page or the content page of the List.
This also works across full and embedded landing pages.
Conversions API Access Token

The Conversions API Access Token will allow us to send events using the Meta Conversions API > Meta guide.
Notes:
By providing Meta Pixel ID, we will track using the browser.
We include user data including but not limited to name, email, and phone when we have it through the Meta Pixel using the browser.
If you provide us with both - your Meta Pixel ID and your Conversions API token, we'll track using the browser as well as using the API server-side >> the only difference is that the page view events are not tracked Server side).
Your Pixel ID is required in all cases. If you don't provide it, nothing is tracked.
Testing the Setup
If you're going to spend money on ads you have first got to test to ensure everything is working!!
Otherwise, you're flushing money drown the drain.
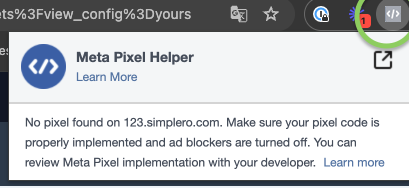
We recommend the Chrome Meta Pixel Helper plugin. It will show you which (if any) Meta pixel and event codes are installed on a site.
Visit a page, subscribe to a list, create a freebie purchase - do the right Meta pixels appear? If not, something is off. Check your setup!
Note: If you're using an Ad Blocker in your browser, be sure to turn that off! I mean we're testing an ad 😀
Some Other Resources:
GDPR notice for those doing business in the EU: Please keep in mind when using tracking pixels that you are doing so in compliance with GDPR, actions such as these may violate rules in regards to consent and profiling. This message does not constitute legal advice. Should you have a question about compliance, please consult a lawyer.
Verifying Your Domain
You only need to verify your domain if:
You want to have authority over which conversion events are eligible for your domain.
You are an educational organization with an .edu email address.
Your email domain doesn’t match your website domain.
You want to manage editing permissions for your ads.
You must verify your custom domain and sub-domain(s), not Simplero's domain.
Domain Verification must be done at the effective top level domain plus one (eTLD+1 ). For example, for www.courses.domain.com, courses.domain.com and domain.com, the eTLD+1 domain is domain.com.
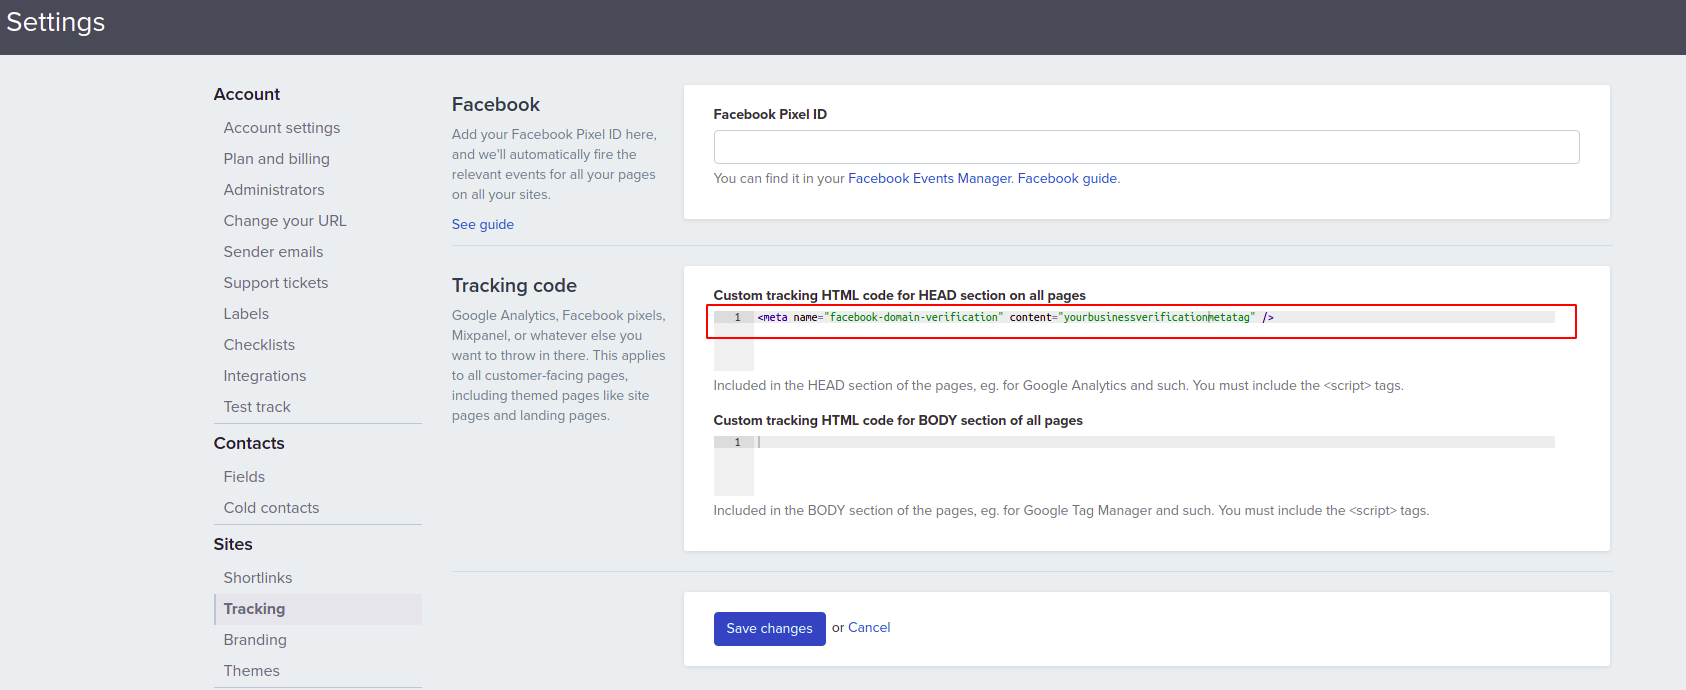
To verify the ownership of your domain where the pixel has been installed you will also need to add the verification meta-tag on your site HTML head section on the same admin page:
-
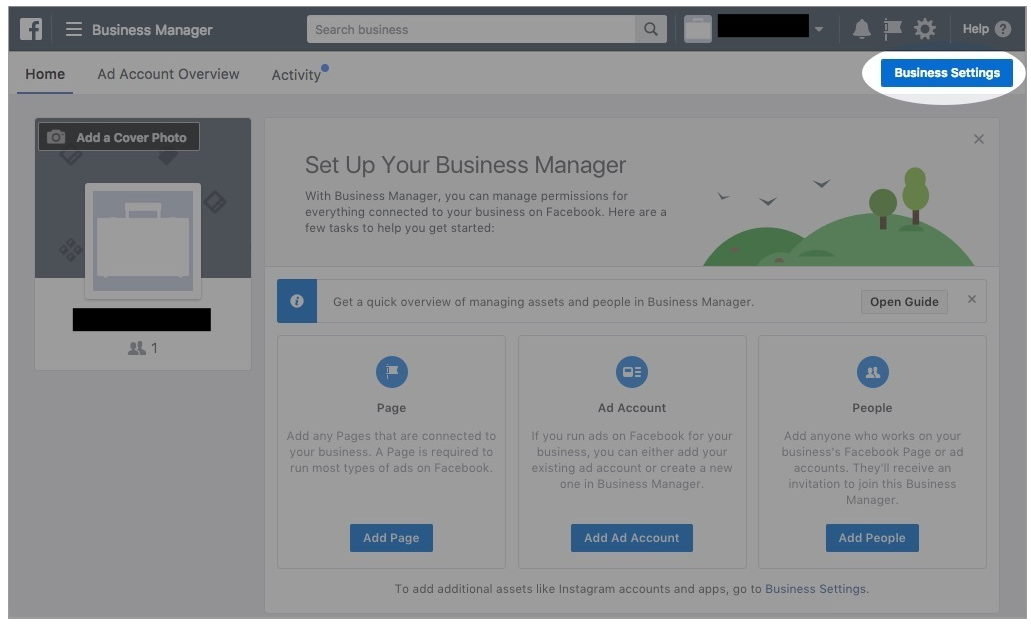
Head to your Business Manager >> Business Settings
 .
.
Business Settings >> Brand Safety >> Domains.
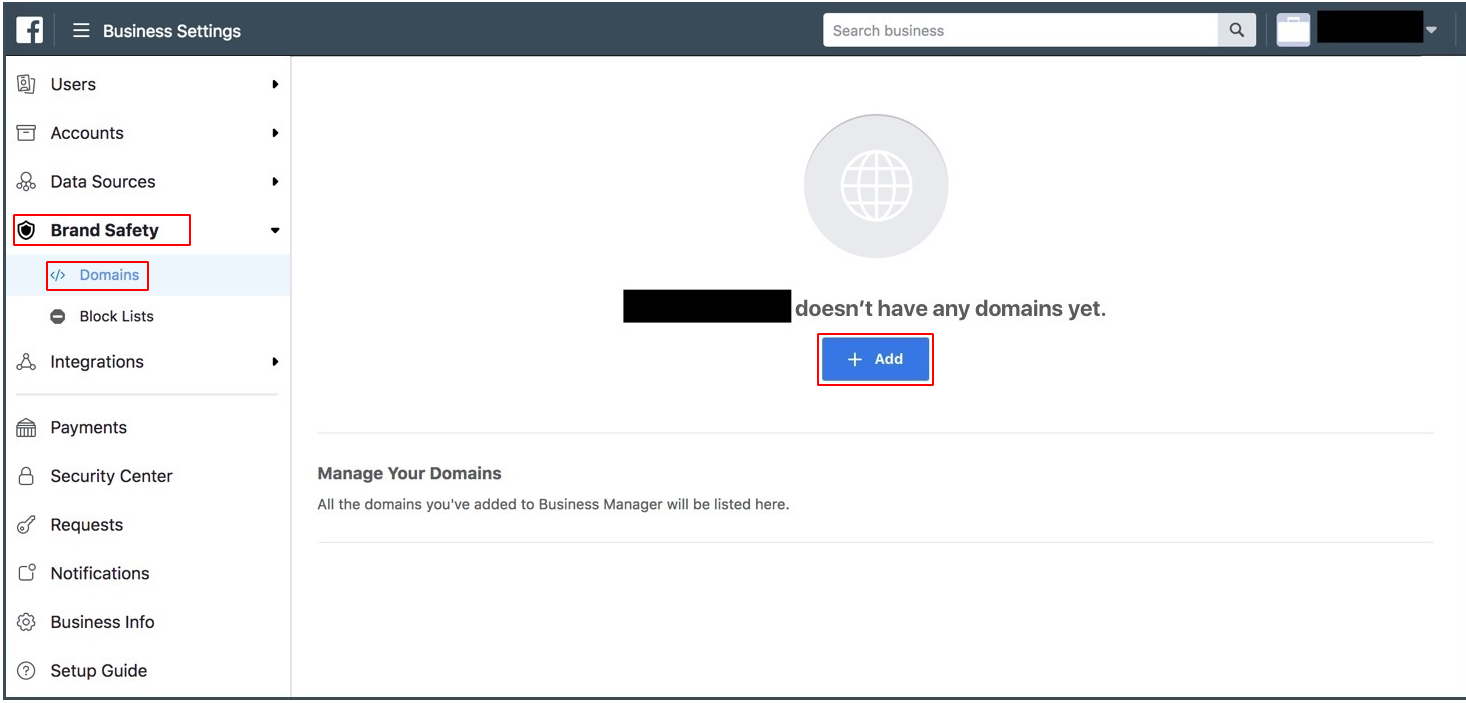
Add >> Add a Domain.
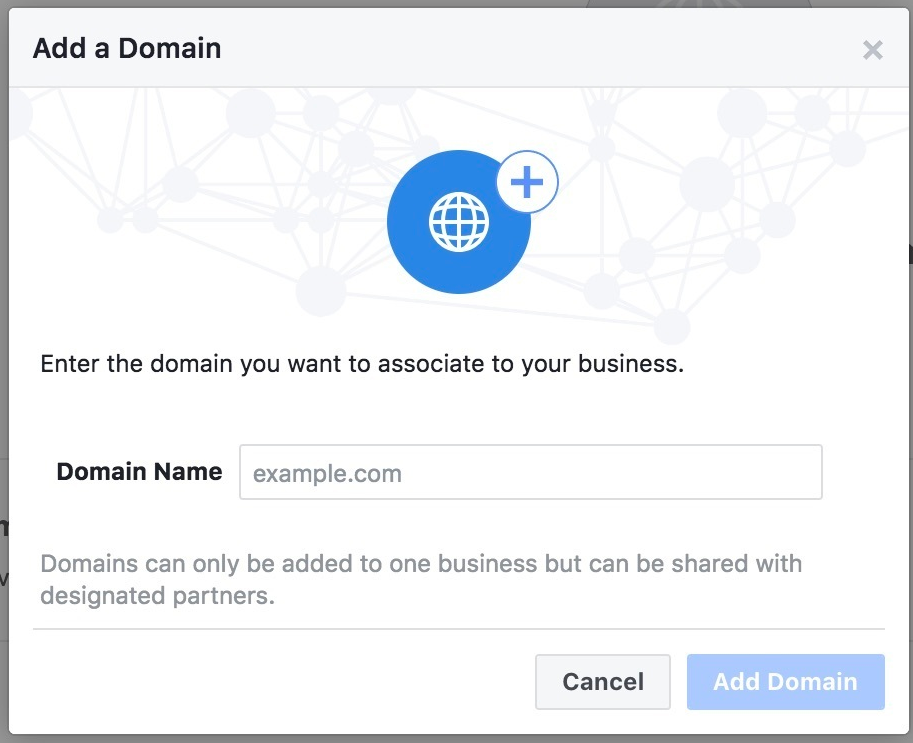
Choose Meta Tag Verification.
-
In Simplero, add the Meta Tag to the <head> section in the HTML of the domain home page.
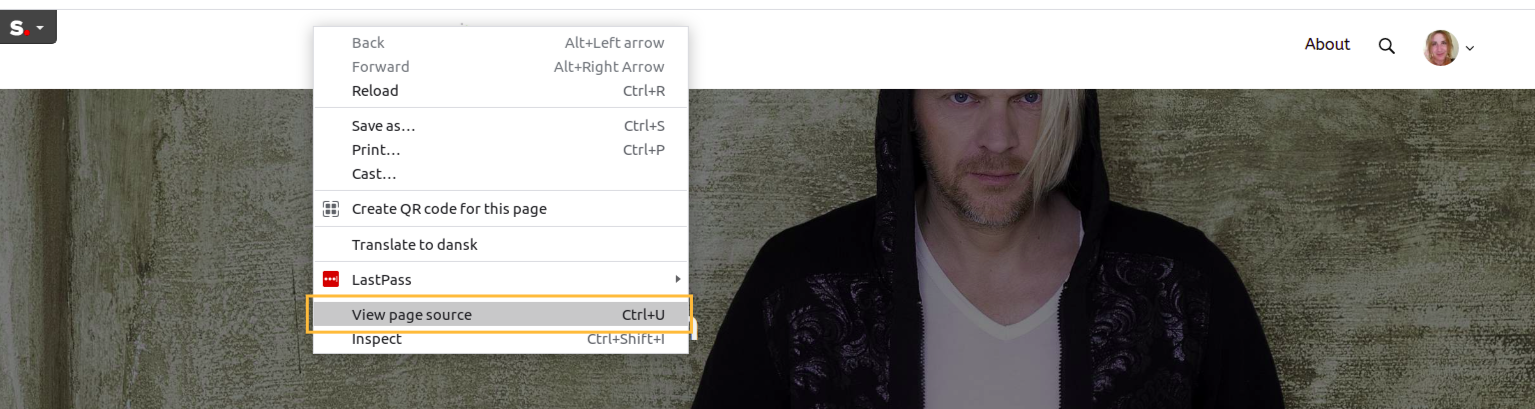
Confirm by visiting your domain home page and open the Source Page View to confirm the meta-tag has been added (right button click on your mouse anywhere on your home page):
 Scroll down to confirm the meta-tag has been added on the page successfully:
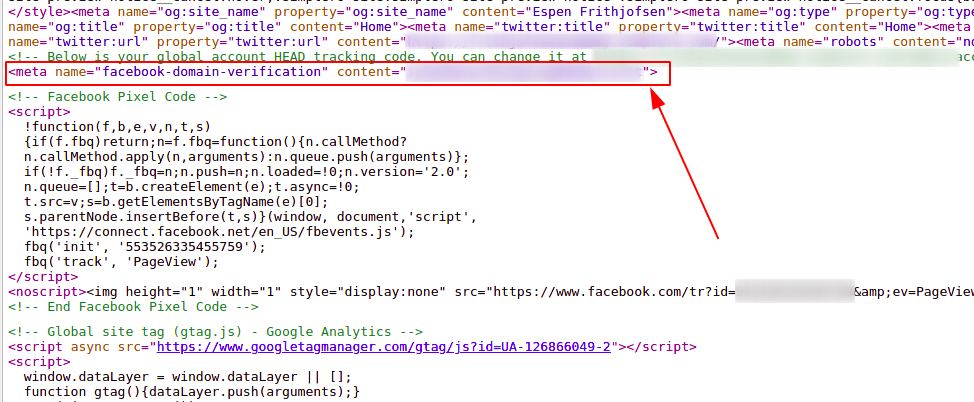
Back in Business Manager >> Verify.
Be sure to leave the Meta tag in the home page.
Assign the Meta page to associate with the verified domain.
Meta App ID
When using a custom domain and the Meta Integration (for example, sharing buttons on the Site Builder,) you’ll also need to bring your own Meta App ID.

If you don’t have one yet, check out Meta developer resources to know where to find it.
You’ll go to https://business.facebook.com/ where you’ll see your Business Portfolio which will have an accounts drop down on the navigation that will show 'apps' within that dropdown menu. There will also be a blue +add button on your screen to create a new app:

When you click the blue add, you'll then see the screen below where you can select create app:

The below screen pop up will show where you can select 'create app':

This take you to a screen to select your 'App name’ as well as the contact email address for the app:

Once you’ve filled out the app name and contact email, you’ll select next which will ask you your use cases 'what are you wanting to do with it'. You have to select a minimum of one use case but you can select as many are relevant for you:

Next you’ll select the ‘business portfolio’ that you want to attach the app to. You can either select one that is already attached to your profile, choose ‘don’t create a business profile right now’, OR create a new business portfolio:

Once you have selected your business portfolio option, Meta will show you any requirements that they have for you to be able to get or maintain user and business data.

Finally, you’ll get to your overview page which will show you all information that you just filled out with an option to go to your dashboard:

Once you’re on your Meta Business dashboard, you’ll be able to see the apps view again but with your new app as well as any additional apps that you may end up adding. You’ll select the relevant app and copy that code to post into your Meta integration in your account:

FAQ
I do not have a custom domain. Do I need one, or can I use Simplero's?
With the latest update on Meta policies, you are required to verify the ownership of your domain to continue sharing your content on Meta. This means you must arrange your own custom domain and follow the instructions above to verify it.
More info on Meta’s Domain Verification and Best Practices for Domain Verification articles.
Does Simplero Integration Cover CAPI?
Yes, it does!
What if the sales from my landing page aren't recording in Meta Ads Manager?
If sales are showing up as Registrations and not Sales in your Ads Manager, or the Purchase Value isn’t recording in there either, here are some things to check:
Make sure your Meta Pixel is installed correctly. Our instructions above show how to do this, and this guide from Meta shows the different ways to configure the pixel.
Download the Chrome Meta Pixel Helper and install it on your browser (if using Chrome). Now run it while visiting your page and clicking your CTA buttons, just to see if it reports any issues!
Check what your Pixel Manager says when you try to complete the action you want record (like checking out on the order form page). Then click the “Troubleshoot Pixel” option on the Chrome Meta Pixel Helper to see what it says for both these instances:

Check whether the Thank You Page for your product is inside of a closed site. If so, try adding a public Thank You page to the product instead.
What is the difference between Meta App ID (in the integration settings) and Facebook App/Page ID (in the site configure page)?
-
Meta App ID (Found under settings -> Integrations):
This refers to the Meta App that you created in Meta for Developers (https://developers.facebook.com/).
It’s the core integration app that connects your entire Simplero account to Meta’s APIs — this is the one used for things like analytics, conversions tracking, pixel data, and general Meta Business integration.
This is a global integration for all sites in your Simplero account
-
Facebook App ID (Found under each site's configure page):
This is for site-specific social features and behavior when content is shared or interacted with on Facebook.
-
Each site in Simplero can optionally have its own Facebook App ID, which is used specifically for site-level social sharing features, like:
Social login (e.g., “Log in with Facebook”), Facebook comments plugin, Open Graph metadata (for correct preview thumbnails and titles when links are shared), and Site-specific tracking if you want each site to be treated as a separate app within Meta.
-
The Page ID (Found under each site's configure page):
This is about displaying content from your Business Facebook Page on your site, through a widget or plugin.
It’s used for business identity and connection to Meta tools, not for API access or app-level features.
Even with the Meta integration active (for analytics, pixel, conversions), you still need the Page ID if you want your site to show your Facebook Page feed or use social widgets.
The summary table below can be helpful:
Type |
Scope |
Purpose |
Where It Comes From |
|---|---|---|---|
Meta App ID |
Global (Simplero account level) |
Connects Simplero to Meta Business tools (analytics, ads) |
Meta for Developers (your Meta Business app) |
Facebook App ID |
Per-site |
Enables Facebook features like login, comments, sharing |
Meta for Developers |
Facebook Page ID |
Per-site |
Identifies your actual Facebook Page for linking, chat, and attribution |
Your Facebook Page (found under “About” → “Page ID”) |
Suite 92530
New York, NY 10003
United States