Contacts are individuals who are part of your customer or subscriber base. Simplero's contact management system allows you to store and organize your contacts’ information. Managing contacts effectively helps optimize marketing efforts and drive business growth.
A list is a group of contacts who have opted-in to receive emails from you, and knowing how to manage and nurture your list(s) is essential to running an online business. Often, a list is referred to as your newsletter, but you might also have a list for a webinar, a summit, or a specific free content download.
Segments are very useful for identifying a specific group of customers in your contacts that's not on a single list or in a single product. For example, you may want to find out who is on a specific list but has not purchased your product. Or maybe you want to see the group of people in your newsletter who have shown interest by clicking on the sales link that you sent in a series of emails.
In Simplero, we can identify these groups and more using the segments feature.
Please note, we don't recommend emailing segments as there's the potential for someone who has unsubscribed to receive an email depending on how the segment is determined.
Segments are very useful for identifying a specific group of customers in your contacts that's not on a single list or in a single product. For example, you may want to find out who is on a specific list but has not purchased your product. Or maybe you want to see the group of people in your newsle…
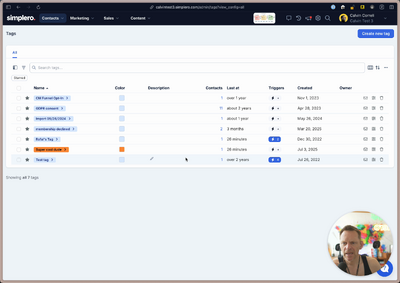
Notes and Tags are two powerful tools that simplify keeping track of important information related to your online business. With Simplero Notes, you can easily attach notes to contacts, allowing you to keep a record of important details such as specific customer requests or purchase history.
Simplero Tags enable you to group together similar contacts or products for streamlined communication and organization. Efficiently tagging items also allows you to create targeted email campaigns which result in higher engagement rates from customers.
Notes and Tags are two powerful tools that simplify keeping track of important information related to your online business. With Simplero Notes, you can easily attach notes to contacts, allowing you to keep a record of important details such as specific customer requests or purchase history.
Simple…
We all know that customer service is vital to any business. Keeping customers happy means they will become longtime customers. But as a business owner, your inbox is probably pretty full and customer emails can get lost in the mix, meaning you could miss the opportunity to support and wow a customer.
Simplero makes the customer service part of business a little easier with our built-in support ticket feature.
Get feedback about your content, and services using Surveys.
Build your own set of questions by choosing from all available custom field types.
Find all responses in one place so it’s simpler to follow up with your members.
Your website is your virtual business card and it is usually the primary website for your business. Simplero's Website is a full-featured website that includes a Blog and Pages where you have control over the content.
Website pages are extremely versatile; they can basically be anything you want them to be. In Simplero, when you choose to add a new page, you have a bunch of options. Some site pages are pre-formatted for you, like the blog and forum, while others like the content page, you design yourself.
Your website is your virtual business card and it is usually the primary website for your business. Simplero's Website is a full-featured website that includes a Blog and Pages where you have control over the content.
Website pages are extremely versatile; they can basically be anything you want t…
Triggers let you take certain actions when something happens. In other words, they are If-then rules that trigger actions based on specified events. Triggers are designed to help you automate various tasks and streamline your online business operations.
There are several locations where you can create a trigger in Simplero: lists, products, links, tags, worksheets, prices... among others. They can be triggered by a variety of different events and execute many different actions.
By utilizing triggers effectively, you can save time, engage with your audience, and deliver personalized experiences to your customers and subscribers.
Triggers let you take certain actions when something happens. In other words, they are If-then rules that trigger actions based on specified events. Triggers are designed to help you automate various tasks and streamline your online business operations.
There are several locations where you can cr…
Simplero Broadcasts is an innovative email marketing tool designed to offer entrepreneurs and business owners the ability to communicate with their clients and followers effectively.
Users can reach out to their audience through customized emails that include: promotions, event announcements, or any other kind of marketing material.
Streamline your email marketing, reuse saved templates, and monitor analytics with Simplero’s clear and concise broadcasting dashboard.
Newsletters offer robust and effective scheduled email marketing for businesses of all sizes. Customizable templates ensure that your content is visually appealing while providing the flexibility to create unique branded designs.
Simplero’s easy-to-use interface lets you establish a weekly, biweekly, monthly, or customizeable automation schedule for your engaging email broadcasts.
Simplero's comprehensive analytics dashboard tracks essential metrics such as open rates, click-throughs, bounces, and unsubscribes to help optimize your marketing efforts.
Newsletters offer robust and effective scheduled email marketing for businesses of all sizes. Customizable templates ensure that your content is visually appealing while providing the flexibility to create unique branded designs.
Simplero’s easy-to-use interface lets you establish a weekly, biweekl…
Landing Pages are a powerful tool for businesses looking to improve their online presence and convert more visitors into customers. The platform offers a wide variety of customizable templates that can be tailored to fit any brand or industry. Simplero's easy-to-use editor makes it simple for even non-technical users to create stunning, responsive landing pages without the need for coding skills.
Additionally, Simplero integrates seamlessly with other popular marketing tools like Google Analytics, Facebook, and Mailchimp, which enables businesses to drive traffic to their landing pages and track results efficiently.
Landing Pages are a powerful tool for businesses looking to improve their online presence and convert more visitors into customers. The platform offers a wide variety of customizable templates that can be tailored to fit any brand or industry. Simplero's easy-to-use editor makes it simple for even …
Affiliate programs are an essential marketing tool that can help you create a robust referral network. With Simplero's affiliate program, you can invite individuals or businesses to promote your products or services and earn commissions for successful referrals. This program incentivizes affiliates to drive traffic to your offerings, expand your reach, and increase sales.
Simplero's platform makes it effortless to manage your affiliate program, track affiliate performance, and provide affiliates with the necessary tools and resources to succeed. By leveraging the affiliate program feature in Simplero, you can tap into the power of collaborative marketing, boost brand awareness, and scale your business through the collective efforts of your dedicated affiliates.
Affiliate programs are an essential marketing tool that can help you create a robust referral network. With Simplero's affiliate program, you can invite individuals or businesses to promote your products or services and earn commissions for successful referrals. This program incentivizes affiliates…
Automations are advanced software tools designed to streamline marketing and sales operations. Simplero’s platform features a powerful scheduling system that automates tasks such as email campaigns, list management, and custom workflows.
The intuitive interface makes it easy to set up complex automated sequences that offer a range of customizable triggers and actions.
Simplero Automations enhance productivity for small business owners, helping them optimize their workflow while freeing up time to focus on the bigger picture. Its extensive marketing capabilities help drive growth by enhancing customer engagement, generating leads, and increasing conversion rates—ultimately leading to increased revenue generation for the business.
Automations are advanced software tools designed to streamline marketing and sales operations. Simplero’s platform features a powerful scheduling system that automates tasks such as email campaigns, list management, and custom workflows.
The intuitive interface makes it easy to set up complex autom…
The email library is your go-to spot for storing and organizing all the emails you want to send repeatedly. It’s where you keep your templates, drafts, and anything you might reuse, so you’re never starting from scratch. It helps you stay consistent, save time, and make sure your messages always hit the right note.
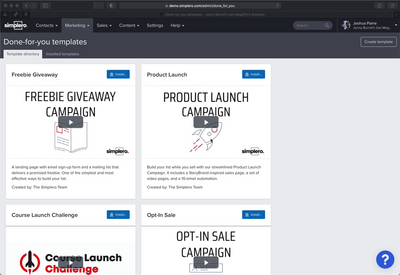
Done-for-you campaigns in Simplero are pre-built templates that can be easily installed with just a few clicks. These campaigns are available in the Marketing section under the Done-For-You Campaigns Catalog. Currently, there are five templates offered, including Freebie Giveaway, Product Launch, Course Launch Challenge, Opt-in Sale, and Product Survey. Each template comes with specific content pre-built for various marketing purposes, such as landing pages, mailing lists, sales pages, video pages, automations, and email sequences.
Additionally, Simplero allows users to create their own Done-For-You Campaigns by labeling the objects they want to include and sharing them with other Simplero members for installation.
Done-for-you campaigns in Simplero are pre-built templates that can be easily installed with just a few clicks. These campaigns are available in the Marketing section under the Done-For-You Campaigns Catalog. Currently, there are five templates offered, including Freebie Giveaway, Product Launch, C…
A funnel helps you map out the customer journey, optimize marketing efforts, improve conversions, and build stronger relationships with your audience, leading to long-term business growth. It visualizes the stages a customer goes through, starting with awareness of a product or service and progressing through various steps until they make a purchase decision.
It includes opt-in forms, order forms, thank you pages and upsells.
Create products, manage pricing, establish special offers, and integrate your choice of several payment processors. Simplero's intuitive product interface makes it easy for users to navigate through different aspects of product management: from setting up subscription plans, free trials, or multiple payment options. Get a clear view of all products and services offered to your customers on your website.
The product catalog is a centralized page where you can showcase and manage your available products. There are three types of products: listed in the catalog, unlisted but purchasable via a URL, and closed products that are not available for purchase and not listed anywhere.
You can create custom product categories and assign products to the appropriate categories. With the product catalog, you can effectively organize and manage your products, making them easily accessible to your customers while maintaining control over their visibility and availability.
The product catalog is a centralized page where you can showcase and manage your available products. There are three types of products: listed in the catalog, unlisted but purchasable via a URL, and closed products that are not available for purchase and not listed anywhere.
You can create custom p…
Oversee, manage, and work with purchases in a highly efficient manner. This section provides a comprehensive overview of purchase details, including the purchase summary, charges and payments, participant information, emails sent, and activities associated with the purchase.
Cancel, refund, issue credits, or register payments in Simplero’s Purchases dashboard. Visit Purchases 101 in this guide to learn the different purchasing terminology, such as participants, activation, paid, failed, delinquent, and subscriptions.
Oversee, manage, and work with purchases in a highly efficient manner. This section provides a comprehensive overview of purchase details, including the purchase summary, charges and payments, participant information, emails sent, and activities associated with the purchase.
Cancel, refund, issue c…
See and analyze all revenue on the invoices page. You’ll find a summary of your Revenue, Taxes, and Affiliate Commission's summary and a detailed table with all the invoices that have been processed through your Simplero Account. You can also check your Transactions, Tax Reports, and Stripe payouts.
Schedule automated tasks for you and your team. Set up steps on your automations to automatically create a task for you and/or your team members.
Customer Journeys manager to have an overview and control of the different stages your customers go through from the start of an offer to delivery of the purchase.
First define the journey, the pipeline. Add stages including automatic triggers. Then Create Deals linked to a contact, a product, and a sales representative that will manage the deal through the Pipeline.
In Simplero, users can create different types of memberships and offer access to exclusive content such as courses, webinars, videos, blogs, forums, and digital products. Implement customizable themes and templates to ensure each site is unique and personalized. The platform aims to simplify the process of managing memberships by providing all the essential tools in one place.
Courses in Simplero help entrepreneurs and small business owners create and sell digital courses. Users can attach engaging content to courses, such as videos, quizzes, and downloadable resources. Simplero Courses are tailored specifically for individuals who want to monetize their expertise by sharing knowledge with a broader audience.
One of the key advantages of Simplero courses is that it enables creators to have complete control over their course offerings without having to rely on other third-party platforms or the limitations imposed by traditional face-to-face teaching settings.
Share your knowledge effectively and build your brand identity with all the tools you’ll need to empower your digital content.
Courses in Simplero help entrepreneurs and small business owners create and sell digital courses. Users can attach engaging content to courses, such as videos, quizzes, and downloadable resources. Simplero Courses are tailored specifically for individuals who want to monetize their expertise by sha…
Create new events, update details, share, or establish an event page. With Simplero events, you can set up simple one-time events or reoccurring events that follow a repeated interval pattern, such as daily, weekly, or monthly.
Allow participants to register for an event, receive immediate confirmation, and even cancel their registration if needed. In the event section of your dashboard, you have control over approving or denying registrations manually, with the participant status reflecting the approval process.
Create new events, update details, share, or establish an event page. With Simplero events, you can set up simple one-time events or reoccurring events that follow a repeated interval pattern, such as daily, weekly, or monthly.
Allow participants to register for an event, receive immediate confirma…
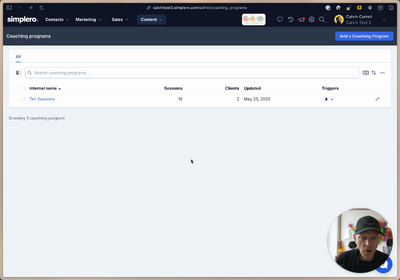
Best way to sell sequences of sessions.
After buying a product, hey automatically get access to x number of sessions of different durations.
They can schedule them, and you can easily see where they're at.
Allow people to schedule events with you!
Link your Zoom account to set a location link automatically and your Google account to sync events to your calendar!
Simplero offers you an online media library for storing your digital content, such as videos, music, images, documents, and more.
Once you add your digital content to the media library you can use the content all over Simplero without re-uploading it multiple times. Admins can track exactly where each media file has been used (in course lessons, landing pages, etc) as well as upload new versions and instantly replace the previous version wherever it is located on a Membership site.
Simplero's worksheets are a lot like physical worksheets you might distribute at an in-person workshop or course. They're easy to create, and you can even save responses to review later. As an admin, you can also your member's responses to the worksheets, so you can better support them. Members can also fill out worksheets multiple times, giving both you and your members the opportunity to see growth and changes over time.
Worksheets have a standalone link option as well as the ability to be used in a lesson on your course membership site.
Simplero's worksheets are a lot like physical worksheets you might distribute at an in-person workshop or course. They're easy to create, and you can even save responses to review later. As an admin, you can also your member's responses to the worksheets, so you can better support them. Members can…
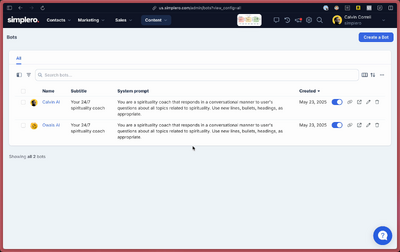
Create bots with a custom system prompt.
Add multiple public or private tiers, and upload the source to the bot and each of its tiers.
You have control over what features you wanna see on your dashboard.
Turn them On/Off at the More section to only see what you actually use.
Use Simplero’s LLM to help you grow, create content, summarize files, courses, and pretty much ANYTHING you have access to in the Simplero and outside world.
View your Simplero accounts, membership sites, and courses you have access to, as well as invoices of purchases you’ve made. Additionally, on the account settings page, you can change your name, email, phone number, password, and social media links.
One of the key features of Simplero is its integrations with other software and applications. These integrations allow Simplero users to connect their accounts with other tools and services, such as email marketing platforms, payment gateways, and social media networks.
Simplero lets you add custom fields to your contacts. You can collect any type of information including complex ones like addresses and phone numbers.
Enable Unengaged Contacts Tracking to stop sending mail to people who aren’t paying attention anyway. Create triggers to manage unengaged contacts.
Branding helps a company stand out from its competitors. It creates a unique identity that sets the company apart and makes it easily recognizable in the market. A strong brand helps customers distinguish a company's products or services from others, leading to increased visibility and competitiveness.
In Simplero, you can set up themes with your branding, choose your colors and logos, design your own email templates and opt-in form designs, choose your greetings, and others.
You can also install Google Analytics Tracking Codes, implement Google Tags, and Track users with TikTok Pixel.
Branding helps a company stand out from its competitors. It creates a unique identity that sets the company apart and makes it easily recognizable in the market. A strong brand helps customers distinguish a company's products or services from others, leading to increased visibility and competitiven…
The Sales Settings page in Simplero offers various features for managing payment processors and payment information. Users can set up a manual payment processor for options like Bank Transfer and Cash. Additionally, Stripe, PayPal, and many other payment processors can be configured by adding them as a new payment processor on this page.
Furthermore, Simplero provides options to customize taxes collected, implement a credit system, and craft new coupons.
Global settings for your Media files, NPS Surveys, and Facets.
The guides in this section are in reference to features that are no longer available but some customers may have been grandfathered into.


