How To Guides
Course Content
-
0 / 25
Your Account
-
How the Trial Works
-
How to Change Your Plan and Billing
-
How to See Your Account Overview
-
Account Administrators
-
Changing Your Time Zone
-
Merging Multiple Simplero IDs
-
Password Security
-
Submitting a Feature Request
-
Submitting a Help Ticket
-
Simplero Account FAQ
-
Closing your Account
-
Simplero Search and Filter Option
-
Setting Brand Colors
-
Places to Change Colors and Graphics
-
Setting Labels
-
The Notice Box
-
Default Account Currency
-
Default Account Email Contact Information
-
Account Location and Language
-
Account Terms
-
Flex Plans
-
Billing at Simplero
-
Your First Three Wins
-
Getting In-Person Help with Concierge
-
Cookie Consent Banner
-
-
0 / 6
Domains and URLs
-
0 / 17
Website
-
Website Overview
-
Website Settings
-
Website Pages
-
Website Blog
-
Website Navigation
-
Understanding SEO
-
How to Customize Your Website Theme
-
Save As Template Feature
-
Product Catalog
-
Editing your Theme Code
-
Save Website to Phone Home Screen
-
Create Your Own 404 Page
-
Social Sharing
-
Social Sharing Image
-
How to Create Anchor Links
-
How to Add a Custom Font to Your Simplero Website or Membership Site7:14
-
How Can You Add the Pinterest Save Button to Your Website Images?2:21
-
-
0 / 11
Your Media Files
-
0 / 4
Landing Pages
-
0 / 10
Forms
-
Form Fields
-
Creating Opt-In Form
-
How to Setup List opt-in Forms8:53
-
Embedded Opt-In Forms
-
Utilizing More Than One Opt-in Form
-
Sign-up Forms on Your Simplero Sites
-
Viewing Custom Questions On Order Forms
-
Default Opt-in Box on Order Forms
-
Use Merge Fields to Register a Subscriber for a Webinar
-
How to Install Google Analytics Tracking Code3:13
-
-
0 / 16
Lists & Contacts
-
How to Manage Your Lists and Contacts
-
Creating a List
-
List Confirmation
-
Subscription: Auto-subscribe, Unsubscribe, Suspend, Resume
-
Unengaged Subscribers and Contact Cleanup2:29
-
Exporting Contacts from my List
-
Merging Duplicate Contacts
-
Changing a Participants Email Address
-
Seeing What Your Customers Sees
-
Tags
-
Segments
-
Do Not Contact and Bounced Emails
-
Preventing SPAM Contacts
-
5 Kick @$$ Strategies to Build your List
-
Preferred Sender Program
-
Cold Contacts Tracking
-
-
0 / 26
Broadcasts
-
Broadcast Overview
-
Email Template Design
-
Email Font Size
-
Creating a Broadcast
-
Send an Email to an Individual or Single Contact
-
Resend a Broadcast
-
Handle Replies to Mass Emails with Ease
-
Expiring Links
-
Insert Option for Broadcasts
-
Magic Content URL
-
Interpolation Keys
-
Editing an Incorrect Link in a Broadcast
-
Auto-publishing a Page in a Broadcast
-
Using Emojis
-
Subject Lines and Preheaders
-
Newsletter Scheduler
-
Email Deliveries
-
About Open Rates for Broadcasts and Auto-Responses
-
How the Sending Limit Works
-
What Do the Secretive Options Mean
-
Why Simplero Doesn't Do Fancy Graphic Emails
-
Delaying Normal Broadcasts During an Email Funnel
-
What Is the Spam Check on Emails?
-
Editing the email footer
-
Creating a Button in a Broadcast
-
Delivery vs. Deliverability
-
-
0 / 7
Other Customer Communications
-
0 / 18
Membership Sites
-
Creating a Membership Site
-
Membership Site Blog
-
Membership Site Forum
-
Membership Site Pages
-
One Membership Site with Multiple Products/Classes
-
Page Access
-
How to Use Auto-Publishing Pages (AKA Dripping Content)
-
Courses5:12
-
Quizzes
-
Course Preview
-
Membership Site Footer Navigation
-
Membership Site Redirects
-
Membership Site Theme
-
Podcast Feature in Membership Sites (RSS)
-
Embedding Videos on Your Site
-
Free and Paid Access to a Single Membership Site
-
Auto-publishing: A Visual Representation
-
Membership Groups
-
-
0 / 12
Products
-
Creating a Product
-
Closing a Product
-
Deleting a Product
-
Creating Multi-Level Access Products
-
Membership Levels
-
Combining a Tangible Product With Your Online Product
-
Tiered Pricing in a Single Product
-
Evergreen Course
-
Student Paced Course
-
Connecting Content to a Product
-
Selling a Downloadable Product
-
Purchase Confirmation Thank You Page
-
-
0 / 35
Product Pricing
-
Payment Processor Setup
-
Understanding the Manual Payment Processor
-
Switching Payment Processor Mid-Stream
-
How to Create Product Prices in Simplero
-
A Warning about Editing an Active Price
-
Campaign and Discount Pricing
-
Credits
-
Multiple Seat/User Pricing
-
Secret Prices and Coupon Codes
-
Global Coupons
-
Subscription Prices
-
Gift Pricing
-
Pay-What-You-Can
-
Price Restrictions
-
Quoting Prices in Multiple Currencies
-
Collecting Tax
-
EU Vat
-
Taxes on Multiple Currency Products
-
Date Specific Installments
-
Milestone Installments
-
Trial Period (Free or Discounted)
-
Giving a Paid Customer a Free Month
-
Free Products
-
Participant Limit
-
Collecting an Outstanding Balance
-
Upsells
-
Downsales
-
Order Bumps
-
Order Forms
-
Order Form vs Freebie Link
-
Authorize-Only Pricing
-
Why do my customers have to manually go in and pay the next installment/renewal of their subscription?
-
Troubleshooting Payments and Refunds
-
Troubleshooting Payment Processor Issues
-
Understanding Your Change in Monthly Recurring Revenue Graph
-
-
0 / 22
Purchases and Participants
-
Participants 101 and Simplero IDs
-
Purchases 101
-
Editing a Purchase
-
Charges & Payments Box in the Purchase
-
Purchase Summary
-
Moving a Purchase to Another Product
-
Adding a Charge to an Existing Purchase
-
Editing a Charge Amount
-
Manual Product Purchase
-
Manual Credit Card Charge
-
Manual Payment or Partial Payment Collection
-
Refund Period
-
Full and Partial Refunds
-
Credit to Transactions
-
Collecting Money Outside Simplero
-
Stop Customers Subscription Payments and Keep their Access Open
-
Migrating a Customer's Purchases from Another System
-
How to Test the Purchase Process and Send Login Credentials
-
Renewal Notifications
-
Invoice Settings
-
Invoices and Expenses1:31
-
Retrying Failed Charges
-
-
0 / 21
Automation
-
All the Ways You Can Automate Things in Simplero
-
Automations: Creating and Managing
-
Starting an Automation
-
Stopping, Pausing, Resuming an Automation
-
Reentering or Starting Mid Automation
-
Time Zone Specific Automations
-
Flows
-
Advancing a Flow in an Automation
-
Using Automations for Sales Funnels
-
Duplicate Automations in Different Languages
-
Email Library
-
Triggers Overview
-
Adding a New Trigger to an Existing List or Product
-
Triggers on Link Clicks
-
Triggers on Prices
-
Abandoned Cart Trigger
-
Global Triggers - Targeting and Re-Targeting Leads
-
Working with Webhook Triggers
-
Bulk Actions
-
Global Snippets
-
What is the Difference Between Automations and Auto-Responses?
-
-
0 / 9
Marketing & Affiliates
-
0 / 18
Integrations
-
Integrating Simplero With Your Website
-
API Keys
-
Zapier
-
Acuity Scheduling for Bookings
-
Leadpages
-
WebinarJam
-
EverWebinar
-
How to Integrate Simplero with Mailchimp
-
Twitter
-
How to Configure PayPal Payment Processor3:15
-
Authorize.net
-
How to setup MobilePay
-
Embed Your Google Docs, Sheets, and Slides into Simplero
-
Install Google Tag Manager on Simplero
-
Facebook Messenger Chat
-
Embed a Facebook Page Widget
-
Facebook Pixel and Verifying Domains2:12
-
How To Use the New Zoom Integration
-
-
0 / 15
Trouble Shooting
-
Can't access the content they purchased?
-
Email Shows "Read" But not "Delivered"
-
Troubleshooting Stripe payment issues
-
Troubleshooting Email Addresses
-
Troubleshooting Opt-in Form Issues
-
Why is my E-mail not being delivered?
-
Troubleshooting Forum Notifications
-
Troubleshoot Price Issues
-
Debug a Facebook Share / LinkedIN share
-
When a PayPal Payment Doesn't Show in Simplero
-
QuickPay Payment Doesn't Show in Simplero
-
Troubleshooting Space Access (A deprecated feature)
-
Troubleshooting Videos Not Playing
-
Troubleshooting Upload issues
-
Microsoft Says a File Has a Virus
-
-
0 / 16
Deprecated Features
-
Spaces (deprecated)
-
Space FAQ (deprecated)
-
Space and Space Page Access (deprecated)
-
Page Types (deprecated)
-
One Space Multiple Products/Classes (deprecated)
-
Free Spaces and Spaces with both Free and Paid content (deprecated)
-
Multi-Language Spaces (deprecated)
-
Postponing Access to a Space Until Later (deprecated)
-
Rearranging the Tabs/Pages/Subpages Within a Space (deprecated)
-
Embedding Videos in Your Spaces (deprecated)
-
Resurrect a Deleted Space (deprecated)
-
Podcast Feature in Spaces (deprecated)
-
FAQ Page in Your Space (Deprecated)
-
Adding a Home Link to the Navigation Menu in Spaces (Deprecated)
-
Deactivating Landing Pages (deprecated )
-
How to Embed a PDF into a Course
-
-
0 / 10
Nerdy stuff
Segments
Segments are very useful for identifying a specific group of customers in your contacts that's not on a single list or in a single product. For example, you may want to find out who is on a specific list but has not purchased your product. Or maybe you want to see the group of people in your newsletter who have shown interest by clicking on the sales link that you sent in a series of emails.
In Simplero, we can identify these groups and more using the segments feature.
Please note, we don't recommend emailing segments as there's the potential for someone who has unsubscribed to receive an email depending on how the segment is determined.
Create a Segment
- Select Contacts from your Simplero Dashboard.
- Select Segments from the dropdown menu.
- Click the blue Create a segment button located in the upper right corner.
- In the Include section, choose where you're collecting these contacts from (e.g., a list, broadcast, product, auto-response, automation, space, etc.).
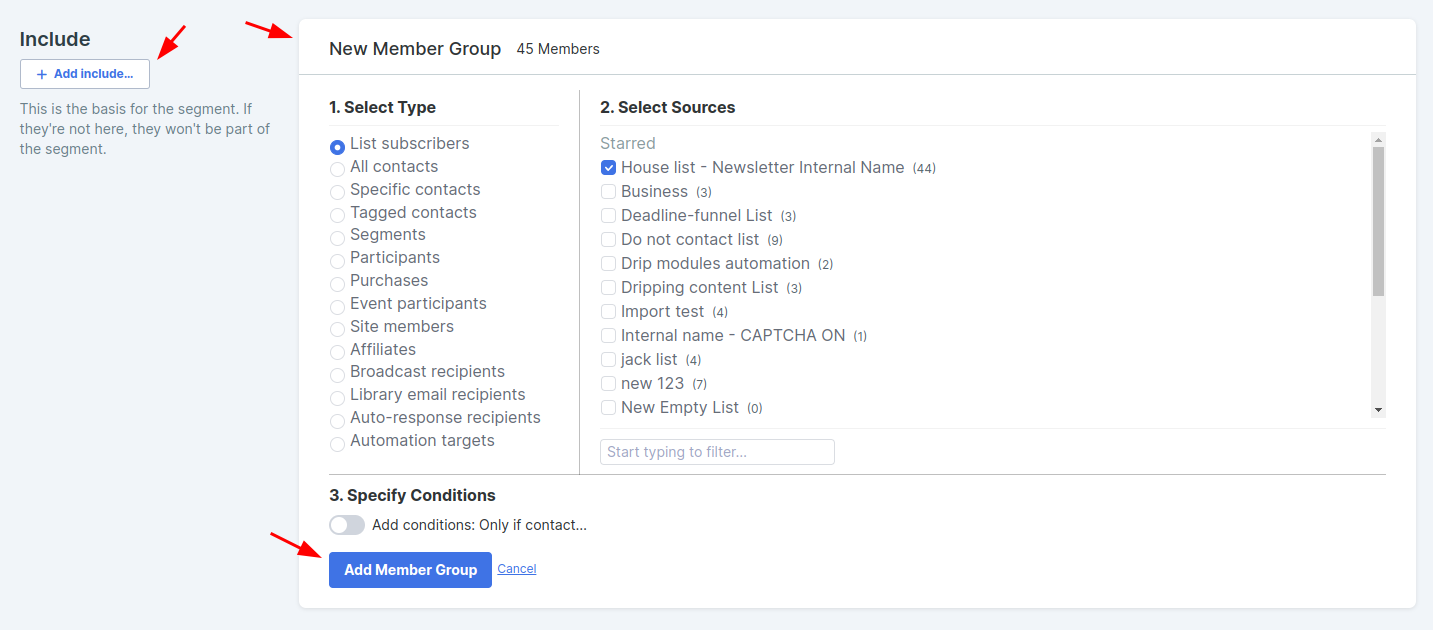
- Then Select Sources (which list, broadcast, product, etc.).
- Specify any additional Conditions for this member group.
- Click the blue Add Member Group button, and this will start populating all the contacts for that segment.
- Click the white + Add include... button to add as many member groups as you would like, and repeat step 4 until everyone you want to include is listed.
Optional stop point
-
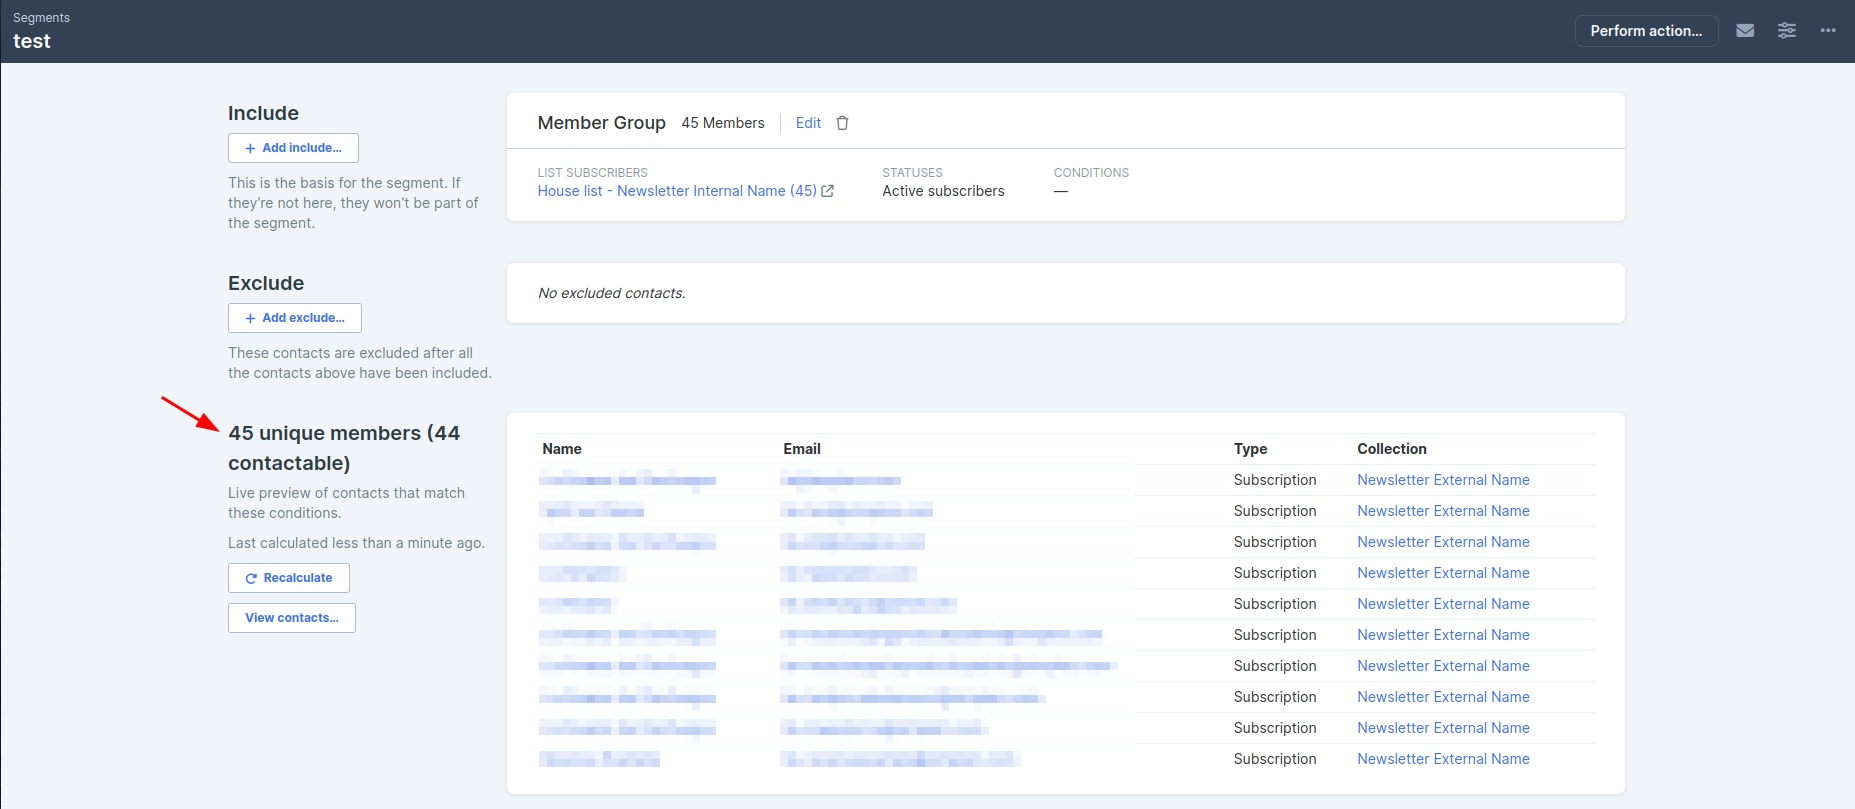
If you are looking to exclude a group of contacts, click the white + Add exclude... button under the Exclude section.
-
Complete each drop-down that appears, select the list, broadcast, tag, etc. that you want to exclude, and click the Save button.
-
You should now see a list of everyone in the segment.
Perform an Action for Your Segment:
Now that you've got your segment, you have two options for performing an action to it.
Option 1:
- Select Contacts from your Simplero Dashboard.
- Select Segments from the dropdown menu.
- Create your segment or select your segment from the list.
- Select the Perform action... button from the top action menu.
- The Perform an action pop-up screen will open.
- Click the drop-down list in each field to select the action you want to perform for this segment, and then click the Go do it! button.
Option 2:
- Select Contacts from your Simplero Dashboard.
- Select Segments from the dropdown menu.
- Select your segment from the list by clicking the box next to the segment name.
- Click the lightning bolt icon on the far right side of the segment name
Send an Email to a Segment
You have two options for sending a broadcast to a segment from the segment screen.
Option 1:
- Select Contacts from your Simplero Dashboard.
- Select Segments from the dropdown menu
- Create your segment or select your segment from the list.
- Select the white Send broadcast button from the top action menu.
Option 2:
- Select Contacts from your Simplero Dashboard.
- Select Segments from the dropdown menu
- Select your segment from the list by clicking the box next to the segment name.
- Then click the Envelope icon on the far right side of the segment name.
Note: When sending an email to a segment, the system doesn't recognize if someone has unsubscribed to a list. Therefore, you'll want to exclude people who've unsubscribed from the list or canceled their purchase for the groups you included.
Rename a Segment
You also have two options for renaming a segment.
Option 1:
- Select Contacts from your Simplero Dashboard.
- Select Segments from the dropdown menu.
- Select your segment from the list by clicking the box next to the segment name.
- Then click the Wrench icon on the far right side of the segment name.
- Enter the new Name for your segment.
- Then click the blue Save changes button.
Option 2:
- Select Contacts from your Simplero Dashboard.
- Select Segments from the dropdown menu.
- Click the segment name you want to rename.
- Select the white Button with three white dots in the top right corner of the page and choose Rename from the dropdown menu.
- Enter the New name for your segment and click the OK button.
Create Conditional Segments
Sometimes you may need to create conditional segments. For example, you may want to know who has purchased both products A and B versus who has purchased either product A or B. Currently, Simplero isn't set up for conditional segments like this with a single button click, but don't worry, it can still be done!
Here's how:
- Create a tag for each condition item you want. In the example above, you would create two tags. For this example, we'll call the first tag "Purchased A" and the second "Purchased B."
- An example tag would look like this:
- Create your first segment (follow the instruction above on how to create a segment).
- Set it up to only include the people who have purchased Product A and click Add Member Group.
- At the top of that first Segment screen, select the Perform action... button, choose the action Add a tag, select the tag you've created for "Purchased A," and click the Go do it! button. (Your action will be performed in the background).
- Create your second segment (follow the instruction above on how to create a segment).
- Set it up to only include the people who have purchased Product B and click Update Member Group.
- At the top of that second Segment screen, select the Perform action... button, choose the action Add a tag, select the tag you've created for "Purchased B," and click the Go do it! button (Your action will be performed in the background).
- Now Perform another action to these two segments. This time the action will be to Remove a tag.
- Go back to your Segment list and select the first segment you created.
- At the top of that first Segment screen, select the Perform action... button, choose the action Remove a tag, select the tag you've created for "Purchased A," and click the Go do it! button (Your action will be performed in the background).
- Go back to your Segment list and select the second segment you created.
- At the top of that second Segment screen, select the Perform action... button, choose the action Remove a tag, select the tag you've created for "Purchased B," and click the Go do it! button (Your action will be performed in the background).
- What this will do is remove that tag from anyone in product B who has also purchased Product A. This is because if the tag isn't there already, nothing will happen to that contact, so the people who've only purchased Product B won't have a tag removed and will be left untouched.
- Then you're going to create one last segment. This time you'll include everyone who has Purchased Product A and everyone who has Purchased Product B. Then you'll exclude anyone who has the tag "Purchased A" and exclude anyone who has the tag "Purchased B" (this excludes people who have only purchased one product because they will have one of those tags).
- An example segment would look like this:
When you're done, you'll be left with only the people who have purchased both Product A and Product B.
If you get stuck or have any questions, contact Simplero support. We'd love to help you!