Want to include a video in your email? Unfortunately, email clients such as Gmail or Outlook won't show videos in emails.
But wait!
Simplero is smarter than that. Just insert your video into your email with Simplero, and we'll magically make it work. How do we do it? We take a still frame of your video, put a "play" button on top, and insert that into your email for you. When people click that, the email opens in their browser, and the video plays perfectly.
All this is handled for you. All you have to do is click a button and upload the video. Boom!
Insert Media From the Media Library
This will work in a broadcast, autoresponder, landing page, or anywhere you're inserting media into the body of a content block.
-
In the email Body area of your content, select the folder icon (Media library).

-
The Insert media file screen will open. Select the media you want to insert and click the Insert selected button.

-
If the media is not in your Media library, select the Upload link from the top menu.

-
Click the Browse button to select your media file from your computer.

-
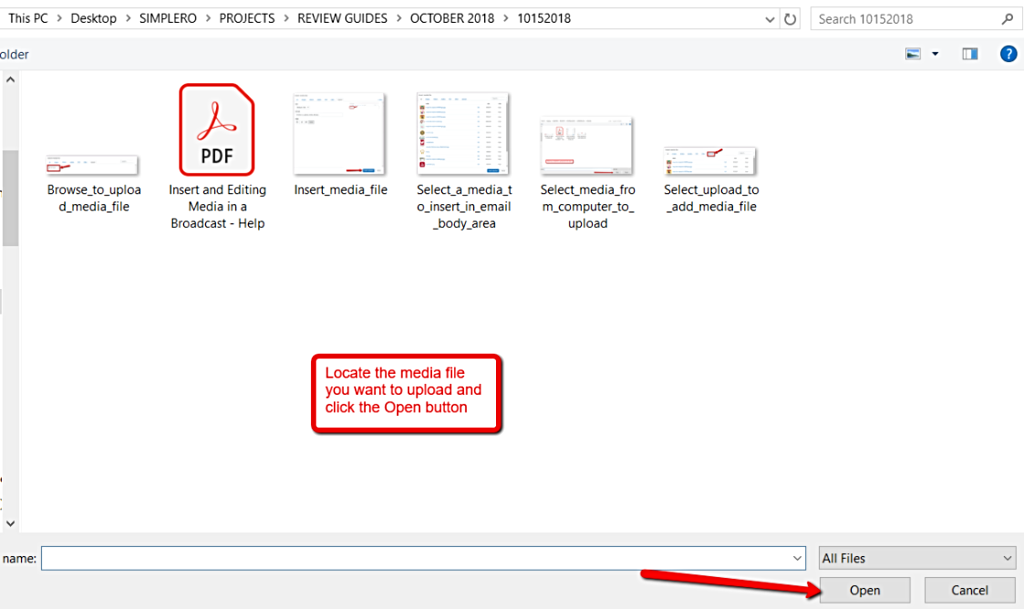
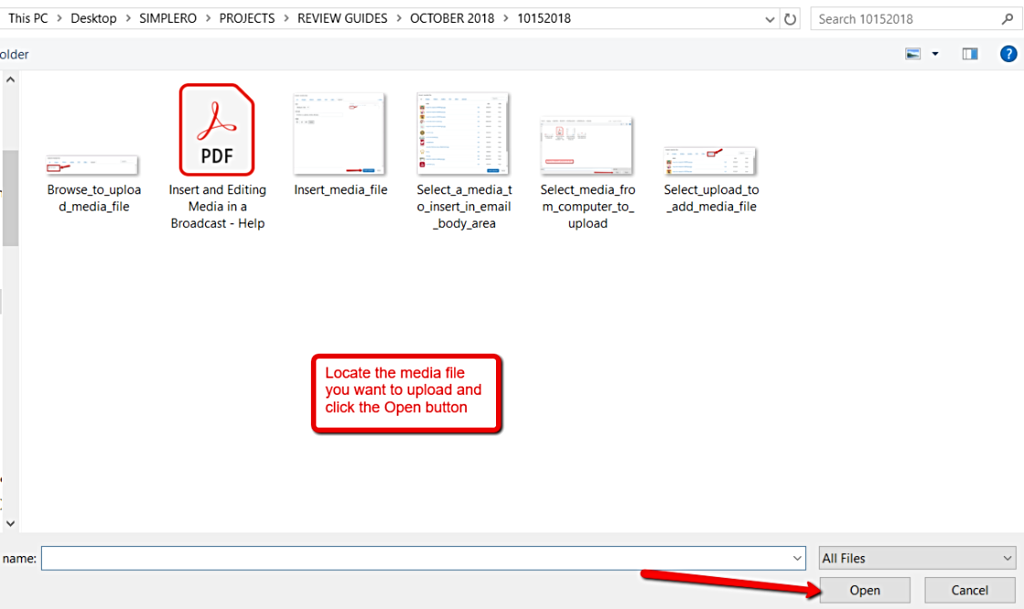
Locate and select the media file from your computer, and click the Open button.

-
You can edit the image appearance such as size and alignment if you wish and/or simply click the Insert selected button.

Alternate Option for Inserting Images
This will work in a broadcast, autoresponder, landing page, or anywhere you're inserting media into the body of a content block.
-
In the email Body area of your content, select the Mountain landscape icon (Insert image).

-
The Insert/edit image screen will open. Click the Upload image button.

-
Locate and select the media file from your computer, and click the Open button.

-
You'll be redirected to the Insert/edit image screen. Enter the Image description if you want and click the OK button.

Alternate Option for Inserting Media in a Content Block
Anytime you're working on a page within your Membership site, there's the option to insert media into a content block.
-
Select Content from your Simplero Dashboard.
-
Select Membership sites from the dropdown menu.
-
Select a Site from your list.
-
Select the Courses tab.
-
Select a Course and click the Lesson you want to insert the media file into.

-
In the Additional content section, there's an option to Add media file and/or Add worksheet.

Edit an Image
We've added the Image editor, which is part of the new WYSIWYG editor. It's a neat little feature to make your life a little easier when creating content.
Here's how to use it:
-
Select any image within your page.
-
Click the image editor button shown on top of the image.

-
This will bring up the Image Editor.

You can now easily make your images pop without going through the hassle of finding and using a desktop image editor. The TOAST UI's Image Editor allows you to make a wide range of changes to your images, from adjusting the contrast to applying filters.
Embed Videos
When embedding a video, most client email providers won't allow you to watch the video in the broadcast itself. The viewer will need to click on the video, and it will open in a web browser, where they can watch it.
Generally speaking, this means you'll need a still frame linked to the video URL. Simplero handles this detail automatically when you add a video from your media library to a broadcast or a library mailing.
When you send out the broadcast, Simplero substitutes the embedded video with the selected still frame. The still frame links to where the video will be played. This all happens behind the scenes for videos in your media library – it won't work if you try to embed a YouTube or Vimeo video in your broadcast. In that case, you'll need to manually insert a frame from the video as an image and link to the video on YouTube or Vimeo.
Line Up Pictures and Text in a Broadcast
-
In the email Body area of your content, select the Folder icon (Media library).

-
The Insert media file screen will open. Select the media you want to insert and click the Insert selected button.

-
You'll be redirected to the Insert media file screen. In the Align area, select the Right, Left, or Center Alignment option and select Insert selected button.

-
You can also click any image within your page and select an Alignment button from the menu bar.

-
You can also type your text within your page, highlight it and click an Alignment button from the menu bar.

Check out the video below for more details.
Note: When adding MP3 or MP4 to a membership site page, they can only be added via the Media File option in the Content area. If you try to add one of those files to the Body of the content area, it will only show as an image.
Also, uploading directly from a URL can cause the photo to not be responsive on a membership site page. To get the ideal sizing, it's best to upload via the media library.


