Full (Dark UI) Help & Knowledge Base
Full (Light UI) Help & Knowledge Base
⌘K
Help Guides
Calendar
tTraining Workshops
Favorites
Playlists
History
Scheduling Links

Scheduling Links

12 lessons
0 of 12 0 of 12 completed
0%
Features-Guides-Scheduling-Links
Introduction to Scheduling Links
Learn how to create and customize scheduling links that allow contacts to book meetings directly on your calendar, streamlining your scheduling process for coaching, sales, or one-on-one sessions....
Scheduling Links
Create scheduling links
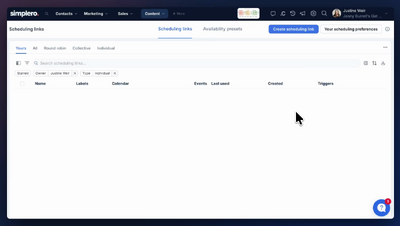
Scheduling Links are the equivalent of Booking Calendars. When you set one up and share it with your members, they’ll see a Calendar where they can book an appointment (a meeting, event, etc)... with you. Navigate to Content >> Scheduling Links: Click on Create scheduling link, give it a name, description and duration, choose Individual, then select the owner of the calendar and press Create scheduling link: You are now presented with the scheduling link setup page: You'll be able to edit the following settings: Name: shown on the Scheduling Link page. Description: shown on the Scheduling Link page. Form title: Override default booking form title. Duration: how long would you like the duration of the events to be. Availability: select a default availability preset or set up a custom availability. Create events on: tell us which calendar we should use to add events scheduled through this link. Choose no calendar (we don't save the event on any calendar), or your Google calendars, Microsoft or iCal calendars. Location: you can choose between: None A Zoom event: if you have an active integration with Zoom we will automatically create the event on Zoom for you too! Google Meet: make sure you pick which calendar to create the event on A Custom URL Collect payment: set up which product order form the user should be redirected to make a payment before the event is scheduled. Custom fields: require additonal info from your clients prior to making an appointment. For example, their phone number if it's intended for sale calls. Then add them to the event summary page by turning the toggle Append custom fields onto the event description ON. Include additional event info: shown in email notifications and the event page after someone schedules an event. Redirect to a custom URL after booking: It can be anywhere inside or outside of Simplero. Automations: add any automations you’d like to start/stop for contacts that schedule/cancel an event through this scheduling link. Limit how many events can be created per period: Set the max per day, per week and per month. Disallow rescheduling: Turn off the ability for your clients to reschedule their meeting. Overriding your default preferences: Event title: used in email notifications, the event page after someone has scheduled an event, etc. Buffering rules to give you some time before and after booked events. NOTE! This includes events blocked from as conflicts from your external calendars. Minimum notice to book an event. Limit how far in the future someone can book an appointment with you. Limit when someone can cancel/reschedule their appointment with you: this applies for the period before the event starts. Master Scheduling Links Now that you are familiar with Individual Scheduling Links, let's jump into the next scheduling level. Create master scheduling links to combine multiple admins' availabilities.  Round Robin This allows you to present users with the union of all the scheduling link availabilities added to the Round-robin scheduling link. For example: You have a team of 2 Concierge members and you'd like to allow your customers to book with any of them.  In that case, you’d create a Round-robin scheduling link and add all two concierge members individual scheduling links to join their availability. 1. Create a Scheduling link for each of your team members: 2. Create a Round-robin scheduling link: 3. Add your team members scheduling links to the Round-robin scheduling link. You'll see both members’ availabilities now show on the calendar availability presets: When you book it will determine who's available at that time and assign the event to that person. When multiple people are available, it just goes down the list top to bottom trying to find an opening. You can drag scheduling links up and down the list to determine in which priority the event should be created to each link. Collective In this case, we will only show the matching availability between all scheduling links added to the Collective link. If we continue with the example above, let's say you'd like now to offer your customers the option to schedule an event with both team members simultaneously. In that case, the calendar will only show as available the time slots where both admins are available to take an appointment. 1. Create a Scheduling link for each of your team members if they don't have one yet: 2. Create a Collective scheduling link: 3. Add your team members’ scheduling links to the Collective scheduling link. You'll see that only the time slots when both members are available will show on the calendar availability presets: You now have the option to set the organizer of the event: When you book it will assign the event to the organizer and use their scheduling link location. Admins that aren’t the organizer will be treated as participants in the event. They will receive either a notification from the organizer's Google, Microsoft or Apple calendar (assuming they have it set up through any of those Calendars), or from Simplero if they’re not using an integrated calendar to create events on. Note! Master Scheduling links are only available on Scale and Skyrocket plans. Editing your default preferences Navigate to your Simplero profile >> Scheduling: Override your availability You can mark days off, periods off without having to do this on your calendar. It also allows you to make spots available regardless of your calendar. Select the time on the calendar and drag it until the end time: Allow: Makes this time available for booking Block: Blocks this time from being booked Force Allow: Allows booking even if you have other calendar conflicts (but respects Simplero events)
Scheduling Links
Set up Availability Presets
You can have multiple Availability presets in your Scheduling Link that will make certain times in your calendar available for booking. You'll find there's one created by default in your account already called Working Hours: You can Create new presets or Edit existing ones by clicking on the preset name: Set up recurring ranges using the +Add a recurring range button. The calendar preview will update the presets for you. Use the arrows at the top right corner to move forward on the month: Availability Presets will show up on the Scheduling link setup page for you to choose which one applies on each Scheduling link in your account:
Scheduling Links
Manage Google Calendars
You can link your own Google Calendars with your Sharing Links so that events created on the Scheduling link get synced in your Google Calendar. We will also show as unavailable those presets where you already have a blocking event in your calendar. Navigate to your Simplero Profile page >> Scheduling: Click on Sign in with Google and follow the connecting steps. Once connected, you will be able to choose which calendars should Simplero check for conflicts using the toggles on the left. It’s very important that you also set up your Default calendar for creating events so we know where to add events created through your Scheduling links: You can also connect and manage your Google Accounts from every scheduling link in your Simplero account. On the Scheduling Link, click on + Connect your Google Calendar, then Sign in with Google and follow the steps in Google's account manager: Once connected, you‘ll see the available calendars under the section Create events on. That will determine which calendar we’ll add your bookings to automatically when booked from that particular scheduling link: You'll also have the option to turn on Overlay my calendar so you can see current events in your Google calendar: Choose if you want to show several calendars on the settings icon at the top right corner: Note! You can also disconnect your Google Account at any time with the ‘x’ right next to it on the Settings and Manage where we check for conflicts popups: As well as from your Simplero profile page >> Calendars & Scheduling Preferences: You can also choose to Show/hide free slots. This makes it easier for the Admin to visualise what’s available based on the events duration: Adding events to more than one Google Calendar If you want to add the events to more than one Google account, you can use a Google shared calendar. Check the guides from Google to learn how to create one. You’ll then need to select it on the Create events on setting:
Scheduling Links
Manage Microsoft / Outlook Calendars
You can link your own Microsoft Calendars with your Sharing Links so that events created on the Scheduling link get synced in your Microsoft Calendar. We will also show as unavailable those presets where you already have a blocking event in your calendar. Navigate to your Simplero Profile page >> Scheduling: Click on Sign in with Microsoft and follow the connecting steps. Once connected, scroll down to the bottom, where you will be able to choose which calendars should Simplero check for conflicts using the toggles on the left. It’s very important that you also set up your Default calendar for creating events so we know where to add events created through your Scheduling links: You can also connect and manage your Microsoft Accounts from every scheduling link in your Simplero account. On the Scheduling Link, click on Choose calendar to overlay, then Sign in with Microsoft and follow the steps in Microsoft account manager: Once connected, you‘ll see the available calendars under the section Create events on. That will determine which calendar we’ll add your bookings to automatically when booked from that particular scheduling link: You'll also have the option to turn on Overlay my calendar so you can see current events in your Google calendar: Note! You can also disconnect your Google Account at any time with the ‘x’ right next to it on the Settings and Manage where we check for conflicts popups: As well as from your Simplero profile page >> Calendars & Scheduling Preferences. You can also choose to Show/hide free slots. This makes it easier for the Admin to visualise what’s available based on the events duration:
Scheduling Links
Manage Apple Calendars
You can link your Apple Calendars with your Scheduling Links so that events created on the Scheduling link can check for conflicts with your Apple Calendar. We do not have the ability to create events on the calendar yet. Navigate to your Simplero Profile page > Scheduling: Scroll to the bottom of the scheduling page and select the Add iCal (.ics): Go to your Apple Calendar and select the calendar you want. This will show a little icon to the right of the calendar’s name, which you will want to click on: A pop-up option will show to either share it with someone or have a checkbox for the public URL. Check the public url then click done: Return to the calendar option and select the person icon again to open your pop-up, which will display the public URL for the calendar. Copy the URL. Return to Simplero and add it to the pop-up box for the Apple URL: Once you’ve connected it, you’ll have the option to use the calendar to check for conflicts when creating new events. This does not allow for events to be created on the calendar itself. You'll also have the option to turn on Overlay my calendar so you can see current events on your Apple Calendar. Note! You can also disconnect your Google Account at any time with the ‘x’ right next to it on the Settings and Manage, where we check for conflicts pop-ups: As well as from your Simplero profile page >> Calendars & Scheduling Preferences:
Scheduling Links
Sharing your Scheduling Link
If you've followed the steps described in the previous lessons on this module, you should now have a Scheduling Link ready to use. You'll find the scheduling link ready to be shared on the top right corner of the Scheduling link screen: Note you can edit the URL slug using the Edit icon next to it: This is how it will look like for your members when they get to the Scheduling Link: On the left side there's info about the event itself: Duration, Location, Name, and Description. There's also a calendar overview where you can click on the day to jump onto that date right away. They can change the time zone at the bottom of the page to make it easier for your members to schedule their appointment or event with you. If they click on an available slot, they will be asked to provide their name and email address to schedule with you.  In case they'd like to also see their Google Calendar overlayed to yours, they can connect their Google Calendar too! They'll see your current events as greyed-out presets overlayed with their Google Calendar: As soon as they schedule the appointment, we will create an event in your Simplero account and (if you’ve connected your account and chose a default calendar for creating events on) in your Google calendar. From the Event page, your member will receive the Link to the Zoom event (if you chose Zoom as the location). They can also cancel their registration or add the event to their calendars from this page too. A calendar notification will be sent to both the admin and the contact who booked the appointment with you. NOTE! Simplero won’t send a notification if the event gets rescheduled or canceled. Events This is where you'll find scheduled appointments. Navigate to the Scheduling Link page >> Events tab: You'll notice your Scheduled events also show up on the Calendar Preview:
Scheduling Links
Reschedule or Cancel an Event
Reschedule an Event If your member needs to reschedule their scheduled event, they can do so from the Event page that gets generated after their booking. Click on Reschedule at the bottom of the page: Pick a new time, add your Rescheduling reason and press Reschedule: The Scheduling links owner will receive a notification when an event has been rescheduled. Want to remove the ability to reschedule? When editing the scheduling link from the backend, toggle on the Disallow rescheduling option: Cancel an Event Your members can also permanently cancel their attendance in two different ways: 1. By clicking on Cancel on the generated Event page: 2. Declining the calendar invite from their own calendar (changing their response or RSVP): When an event becomes canceled, it's deleted from your Google calendar & Zoom, and it no longer factors into your availability presets. Note! A canceled event is a final state, i.e you can't un-cancel a canceled event: If someone RSVPs no, we will cancel their registration right away and send a notification to the organizer that someone responded "No" to the event. The notification includes a link to cancel the event and make that slot available again: You can, as an admin, cancel an event as well from the Scheduling Link >> Events page: If the Scheduling link is linked to your Google Calendar, Google will notify the scheduler of the cancellation. Canceled and Rescheduled events will remain in the organizer calendar as Free slots. This will help keeping track of changes on your scheduled events: Event cancelled triggers The event cancelled trigger will fire when the event officially becomes cancelled. For example, if someone replies "No" to the event invitation, the event is not cancelled yet until the organizer confirms the cancellation.
Scheduling Links
Adding triggers and automations to scheduling links
Adding Triggers You can automate any actions available in Simplero using triggers. Hurray! 🎉 Find them on the Scheduling links overview table: Click on Add: You can edit/delete triggers by clicking on them directly on the table: Adding automations There’s a shortcut to link an automation to a Scheduling link, although you could still set it up using triggers as explained above. Go to the Scheduling link you want to link an automation to. Scroll down until you see Automations on the left side-bar: You can pick multiple automations. However, you'll notice that only Participant Event type automations will be listed as an option. This is so that the automation can start the automation when someone schedules an event using the scheduling link and stop it if the event gets cancelled. FAQ I see a warning on the automation which indicates it’s not fully compatible. If you link an automation to a scheduling link, then you change the automation type to anything different from Event participant, this warning will show up on the automation picker. What does the warning mean? When an automation is not set to Participant Event type, the automation will run on the contact, not on the event that has been scheduled. Why is that an issue? Let’s say John schedules an event for Tuesday and another one for Thursday. If the automation type is set to Flexible, John’s contact will enter the automation twice. Now John can’t make it on Tuesday and cancels the booking for that day. Since his contact entered the automation, the automation stops for John. There are 2 flows for John’s contact record. The automation stops the contact flow, since there are 2 flows, it stops them both. How do I solve it? Go to the automation settings page and change the automation type to Event participant. Let’s go back with John. John schedules now for Monday and Wednesday. Since the automation is now set to the Event participant, there will be 2 event flows in the automation. John cancels Monday’s event, so the automation flow for Monday stops, while the flow for Wednesday’s event continues running.
Scheduling Links
Paid Scheduling Links
Link your Scheduling link with a Product in Simplero to collect payment before scheduling an event with you. You’ll find the Product setting on the Scheduling link settings page under Collect payment: Now when someone books an appointment through your scheduling link they will be redirected to the product order form. There will be also be a 15 minute countdown timer at the top so they complete the payment and booking as soon as possible. Once the payment has been completed, they will get redirected to the Event page or to your custom URL if you set one up. Note! If the payment doesn’t go through within 15 minutes, the event will get automatically canceled in the background and the spot will become available again for future scheduling.
Scheduling Links
Advanced Rescheduling/Cancelling limits
Simplero supports a sophisticated reschedulling feature that allows you to restrict with who and when your clients can reschedule an event. Go to the scheduling link admin page where you’ll find the following settings: Restrict rescheduling Override when can someone cancel or reschedule an event Restrict rescheduling You can disallow rescheduling an event by turning on the toggle Disallow rescheduling. You can add a message on the event page if you would like to provide your clients with further instructions on how to reschedule through your Support/Sales/… teams. As an admin, you can now navigate to the event in your dashboard and manually change the reschedulling restriction to allow that particular event to be rescheduled. Once the admin has updated the rescheduling policy, your client will be presented with the option to reschedule their appointment in the same event page: Let’s have a look at how this feature looks like in master links: round-robin and collective. First thing to notice is that there are multiple options: Anyone, Same person, and Disallow. You can now restrict whether your client will be presented with the scheduling link calendar availability or just the same person they have already booked with. Disallow will have the same impact as it does on individual links. If you disallow rescheduling on a master link you can also include a message with further instructions. The admin will have the ability to update the rescheduling policy for an existing event to allow the end user to reschedule with anyone, the same person or keep it disallowed. Override when can someone cancel or reschedule an event Set up a limit on when can someone cancel or reschedule an event. Let’s say your reschedule and/or canellation policy only allows changes 1h before the event. Scroll down to the Override defaults section and turn on the toggle Override when can someone cancel or reschedule an event and choose the period in which it's not possible to cancel or reschedule: Note that the restriction applies right after booking and before the event starts. If the end user attempts to cancel/reschedule within the restricted period, they will be notified with a the following warning: Reach out to support if you have any further questions or need help setting up your rescheduling and cancelling policies!
Intro to Simplero- Building your content
Scheduling links
Scheduling Links are the equivalent of appointment booking calendars. Once you set it up and share it with your members, they will be presented with a Calendar where they can book an appointment, meeting, or event,... with you or your team. Check the How-To Guides here. Disclaimer: This was still a beta feature at the time the video was recorded. Improvements are coming in future versions of the feature. We encourage you to submit a feature request if you have suggestions on how to improve it!
Simplero
Features Why Simplero? About Pricing
Partner
Become a Partner Work at Simplero Get certified
Get Help
Support Guides Concierge Certified Experts Implementation Workshops
Tools
Mobile App Simplero Coach
Resources
Online Course Creation Guide
Compare
Kajabi Teachable Thinkific ClickFunnels Kit (ConvertKit) Skool Lumant Mighty Networks Circle ActiveCampaign Keap/InfusionSoft WordPress
Legal
Privacy Policy Terms of Service Disclaimer
Copyright © 2026 Powerful Through Grace, Inc. dba Simplero · 1 Chestnut Hill Plaza ·#1139 ·Newark, DE 19713·United States
powered by